

In this comprehensive guide, we'll walk you through how to connect Grigora MCP with Windsurf / Devin Desktop. We'll show you how to access the MCP configuration, add the Grigora MCP server, authenticate your Grigora account, grant the required permissions, and verify that the connection is successful.
Note: Windsurf is now available as Devin Desktop. Depending on the version you are using, you may see either the Windsurf or Devin Desktop branding. The connection process described below applies to both.
Grigora provides a remote MCP server that can be connected using the following endpoint:
https://mcp.grigora.co/mcp
Prerequisites
Before you begin, make sure you have:
Windsurf / Devin Desktop installed on your computer.
A Grigora account.
Access to at least one project in your Grigora account.
An active internet connection.
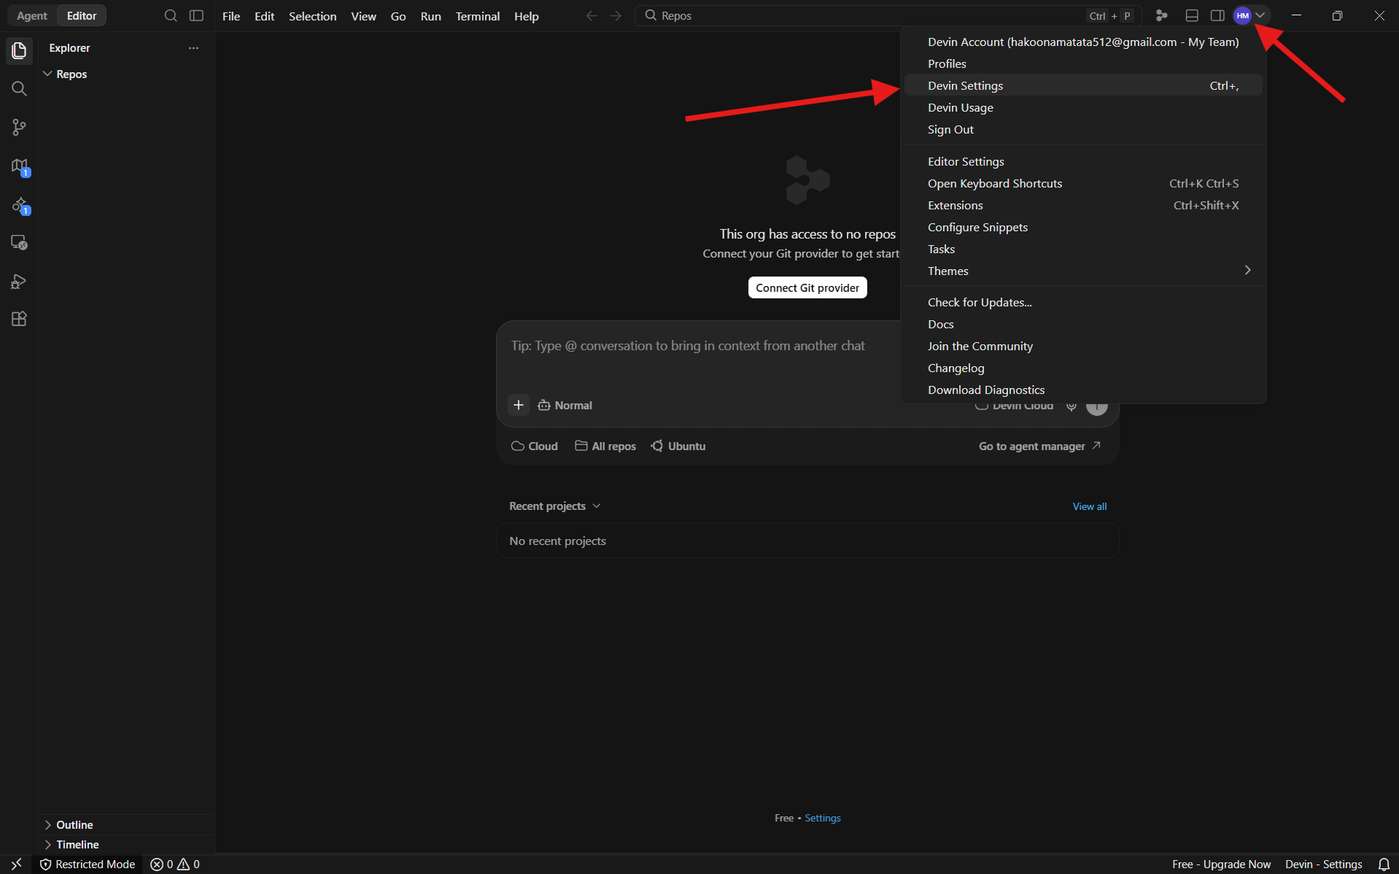
Step 1: Open Windsurf / Devin Settings
Open Windsurf / Devin Desktop and click the Settings option or press ctrl + ,. to open the application settings.
Step 2: Open Configuration
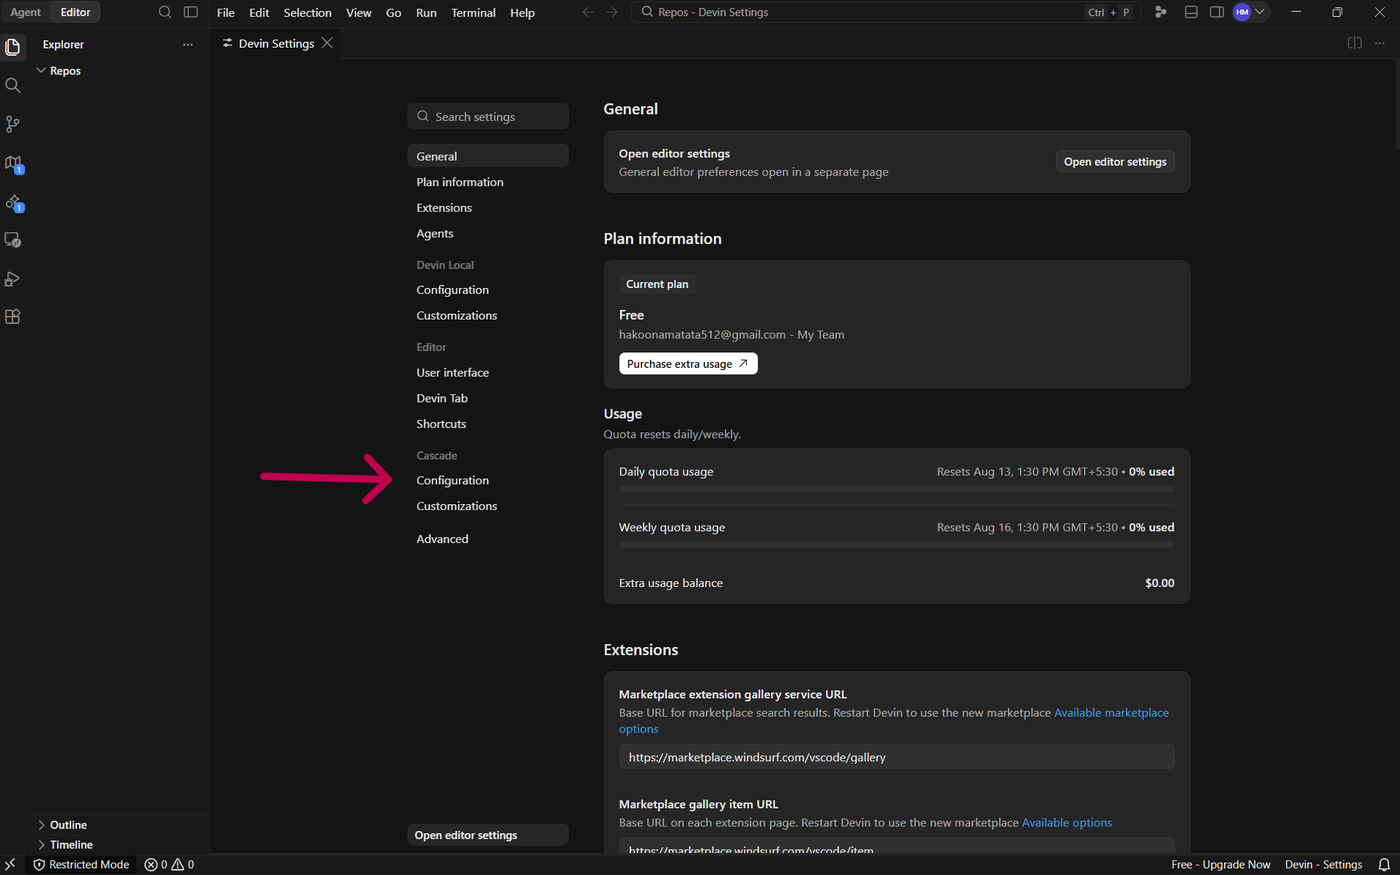
In the Settings panel, select Configuration from the sidebar.
The Configuration section contains the settings used to manage various integrations and application features, including MCP servers.
Step 3: Open the Cascade MCP Marketplace
After opening Settings → Configuration, open the Cascade MCP Marketplace.
The marketplace lets you browse available MCP servers and add custom MCP servers that are not listed.
Click Add custom MCP in the top-right corner to add Grigora manually.
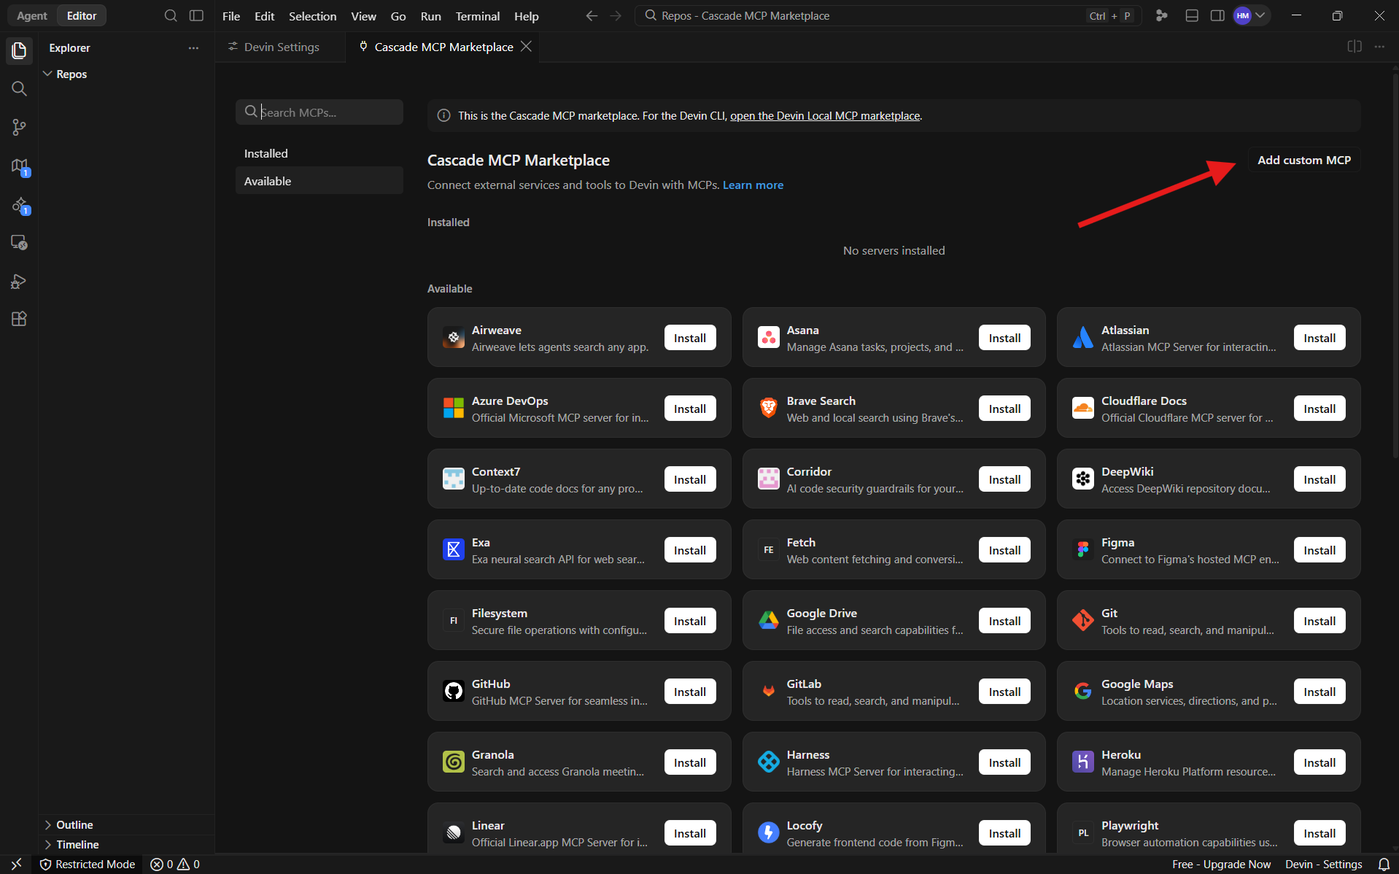
Note: If you are using an older version of Windsurf, the MCP configuration interface may look different. You may see options such as Add Server or View Raw Config instead. In that case, use the available MCP configuration option to add Grigora.
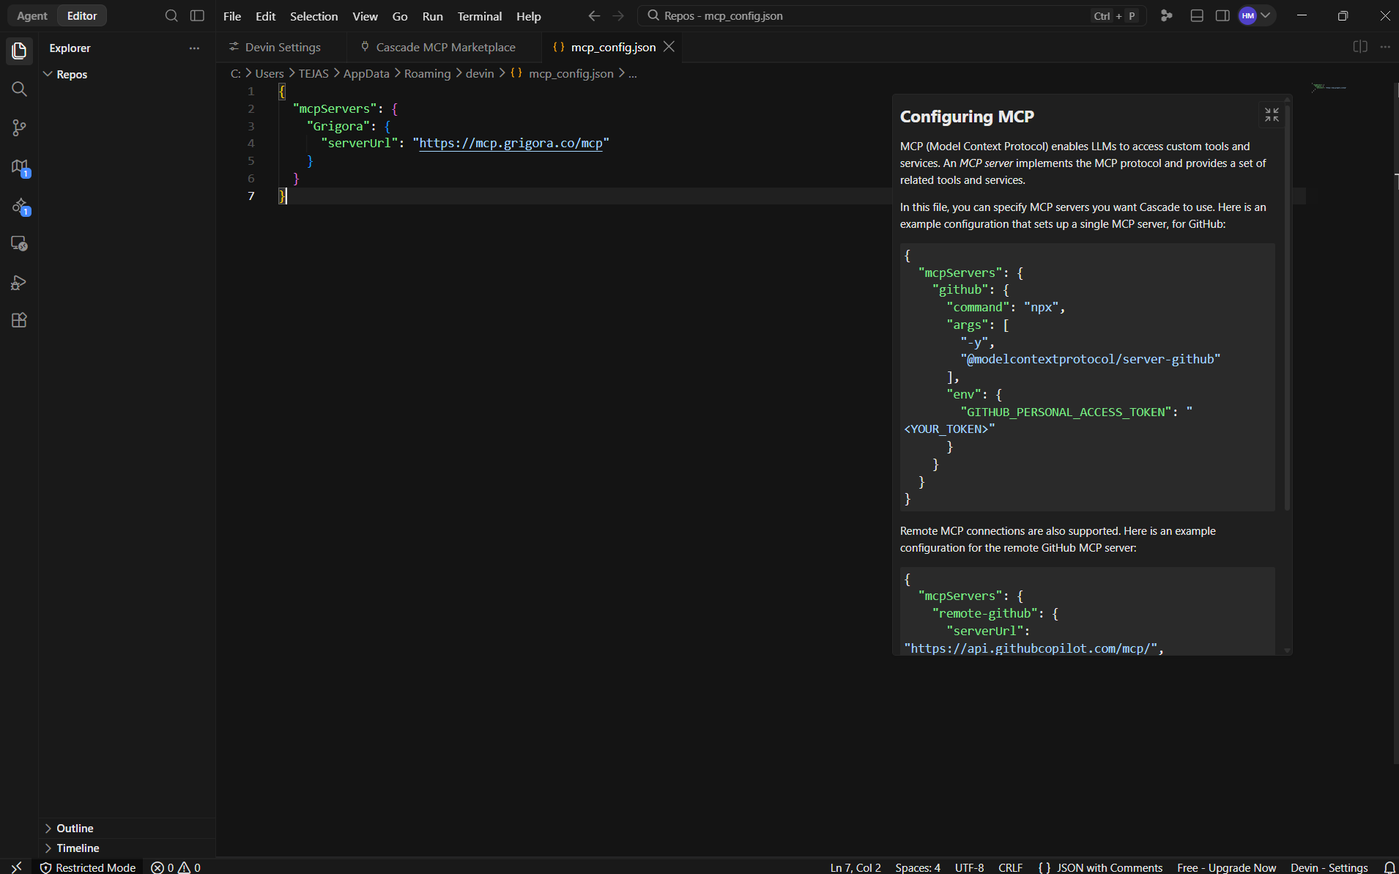
Step 4: Configure Grigora MCP
After clicking Add custom MCP, you'll be taken to the MCP configuration screen. Enter the Grigora MCP server details and continue with the configuration.
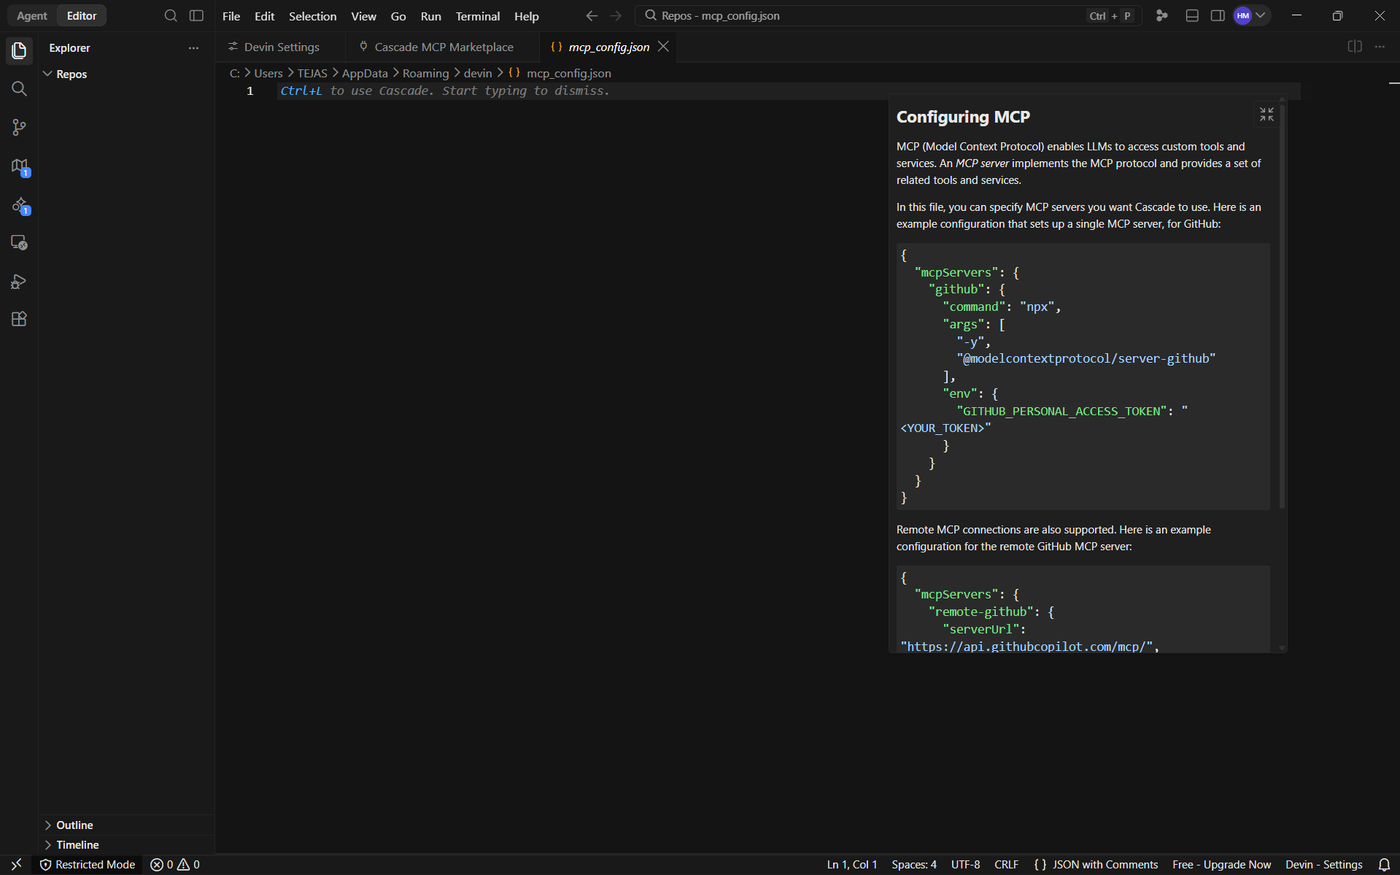
Step 5: Enter Grigora MCP Details
Enter the following details in the MCP configuration:
Name: Grigora
Transport: HTTP
Server URL:
https://mcp.grigora.co/mcp
The server URL points Windsurf / Devin Desktop to Grigora's remote MCP server.
Step 6: Save the MCP Configuration
After entering the Grigora MCP details (or configuring the server in the raw config.json file), save the configuration.
Grigora will now appear in your list of configured MCP servers.
[Image Placeholder: MCP configuration with the Save button highlighted]
Step 7: External Website Pop-up & Authentication Trigger
Once Grigora is configured and saved in the raw configuration file (mcp_config.json) or added as a custom MCP, Devin Desktop automatically displays a confirmation pop-up window:
"Do you want Devin to open the external website?"
https://mcp.grigora.co/authorize?...
The dialog displays the Grigora OAuth authorization URL and provides four options:
Open: Immediately opens the authorization link in your default web browser.
Copy: Copies the authorization URL to your clipboard.
Configure Trusted Domains: Opens settings to configure trusted web domains.
Cancel: Closes the dialog without launching your browser.
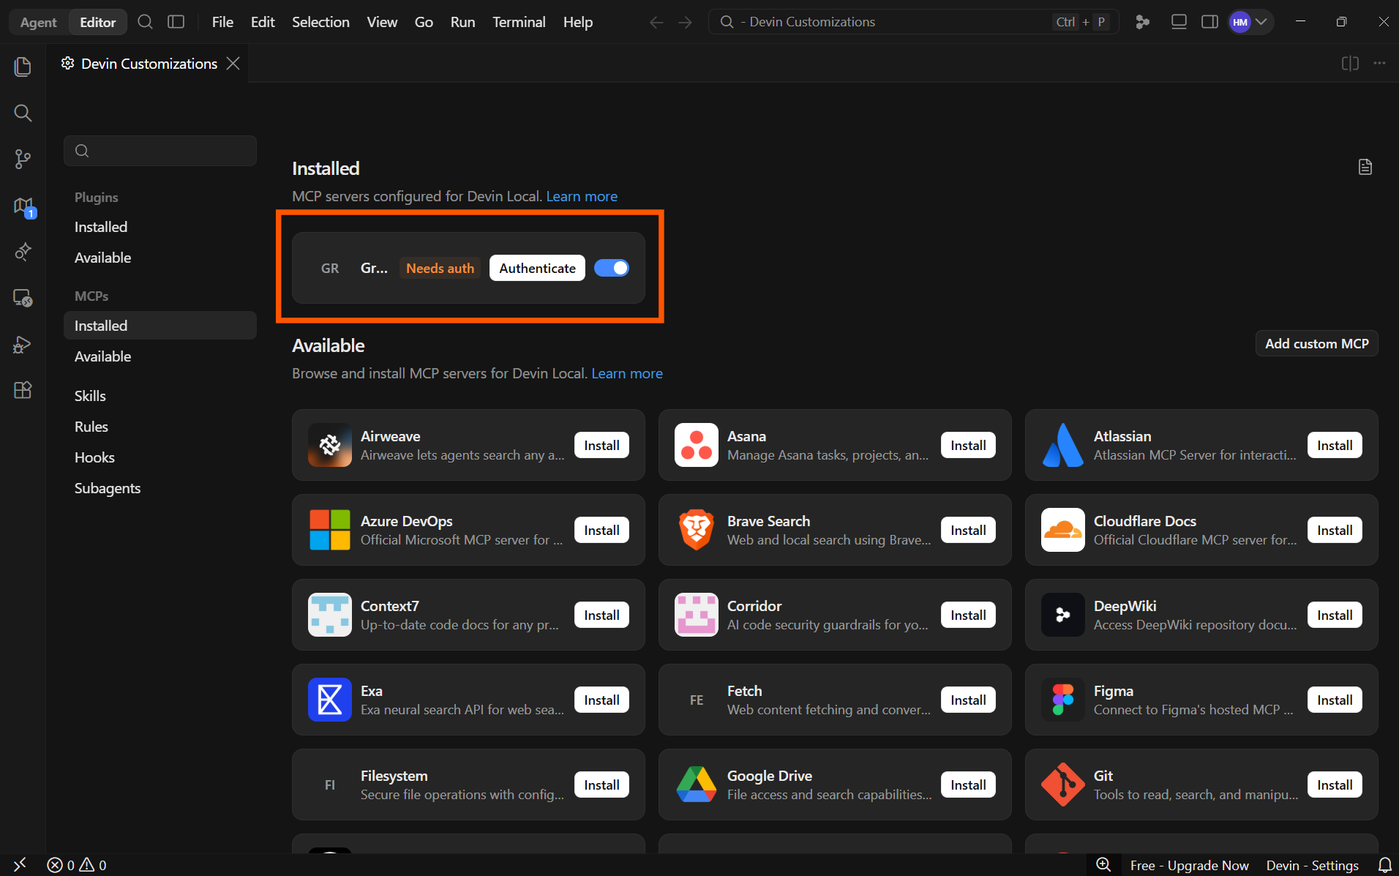
If you dismiss or cancel the pop-up, navigate to Devin Customizations → MCPs → Installed. Grigora will appear in the installed servers list with an amber Needs auth badge (or Not connected status) and an Authenticate button next to the toggle switch.
Click Authenticate to launch the browser authorization flow at any time.
Step 8: Review Capabilities & Confirm Callback URL
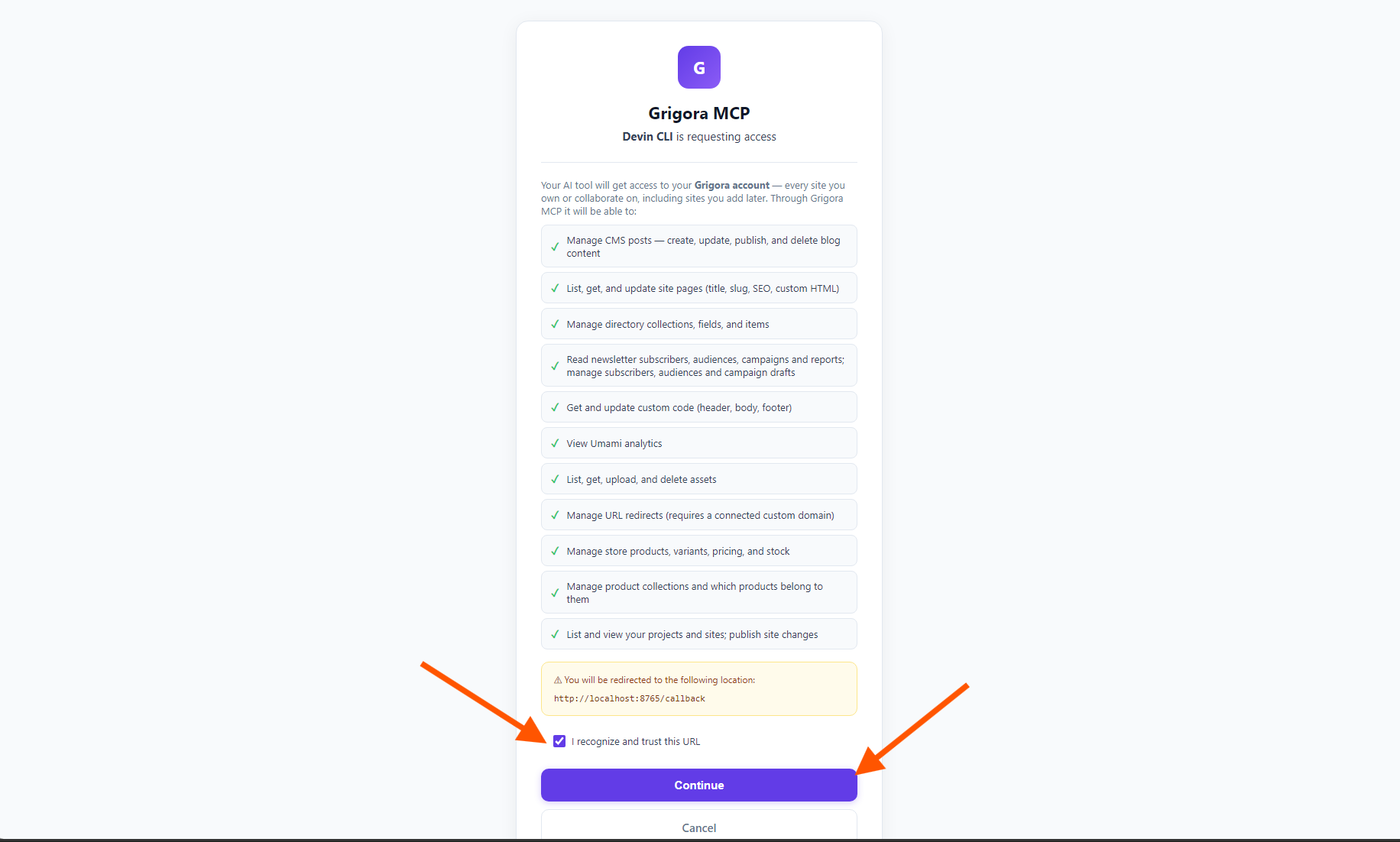
Clicking Open in the pop-up (or Authenticate in Devin Customizations) opens the Grigora MCP permission consent screen in your browser, stating:
"Devin CLI is requesting access"
The screen outlines the full capabilities granted to Devin CLI across all current and future sites in your Grigora account:
Manage CMS posts — create, update, publish, and delete blog content
List, get, and update site pages (title, slug, SEO, custom HTML)
Manage directory collections, fields, and items
Read newsletter subscribers, audiences, campaigns, and reports; manage subscribers, audiences, and campaign drafts
Get and update custom code (header, body, footer)
View Umami analytics
List, get, upload, and delete assets
Manage URL redirects (requires a connected custom domain)
Manage store products, variants, pricing, and stock
Manage product collections and which products belong to them
List and view your projects and sites; publish site changes
Below the permission list, review the callback redirect location banner (http://localhost:8765/callback). Check the required checkbox:
☑ I recognize and trust this URL
Then click the solid purple Continue button.
Step 9: Connect Your Grigora Account
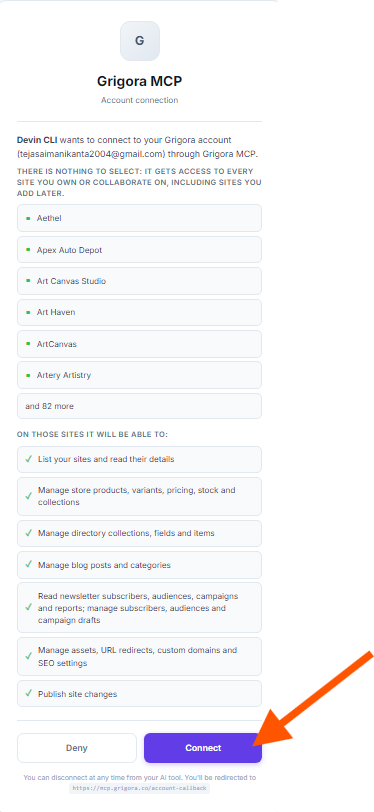
After clicking Continue, the Account connection screen appears:
"Devin CLI wants to connect to your Grigora account through Grigora MCP."
The page lists all websites associated with your Grigora account along with the actions Devin CLI will be able to perform on those sites:
List your sites and read their details
Manage store products, variants, pricing, stock and collections
Manage directory collections, fields and items
Manage blog posts and categories
Read newsletter subscribers, audiences, campaigns and reports; manage subscribers, audiences and campaign drafts
Manage assets, URL redirects, custom domains and SEO settings
Publish site changes
Click the solid purple Connect button in the bottom right corner (or Deny to cancel).
Step 10: Confirm Connection & View Available Tools
Once you click Connect, Grigora finalizes the authorization and redirects back to Devin Desktop.
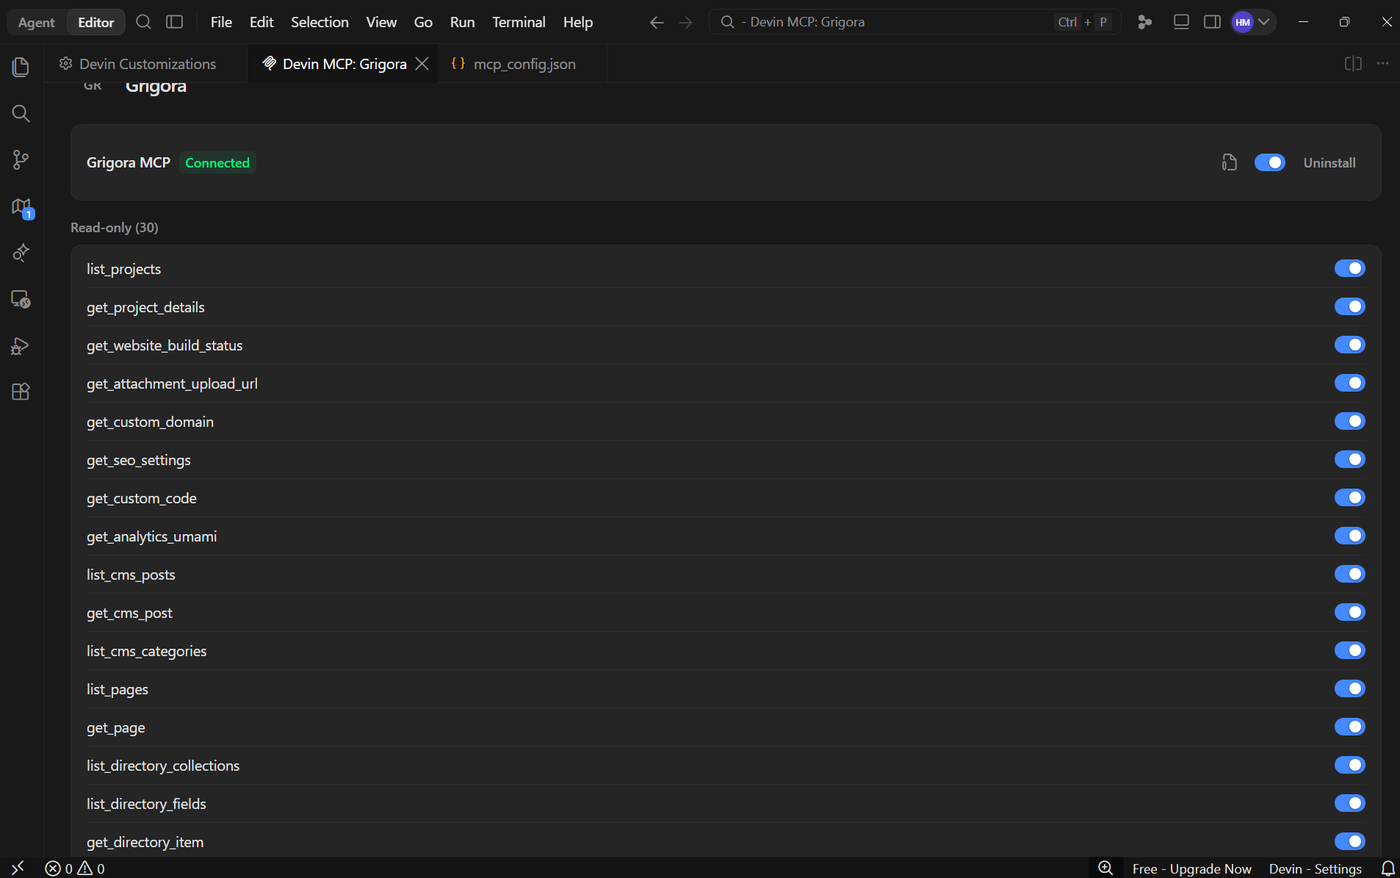
Return to Devin Customizations → MCPs → Installed to verify the connection:
The amber Needs auth badge is cleared, and the toggle switch shows active (blue).
All connected Grigora MCP tools are now loaded and ready for use.
Step 11: Start Using Grigora MCP in Chat / Agent
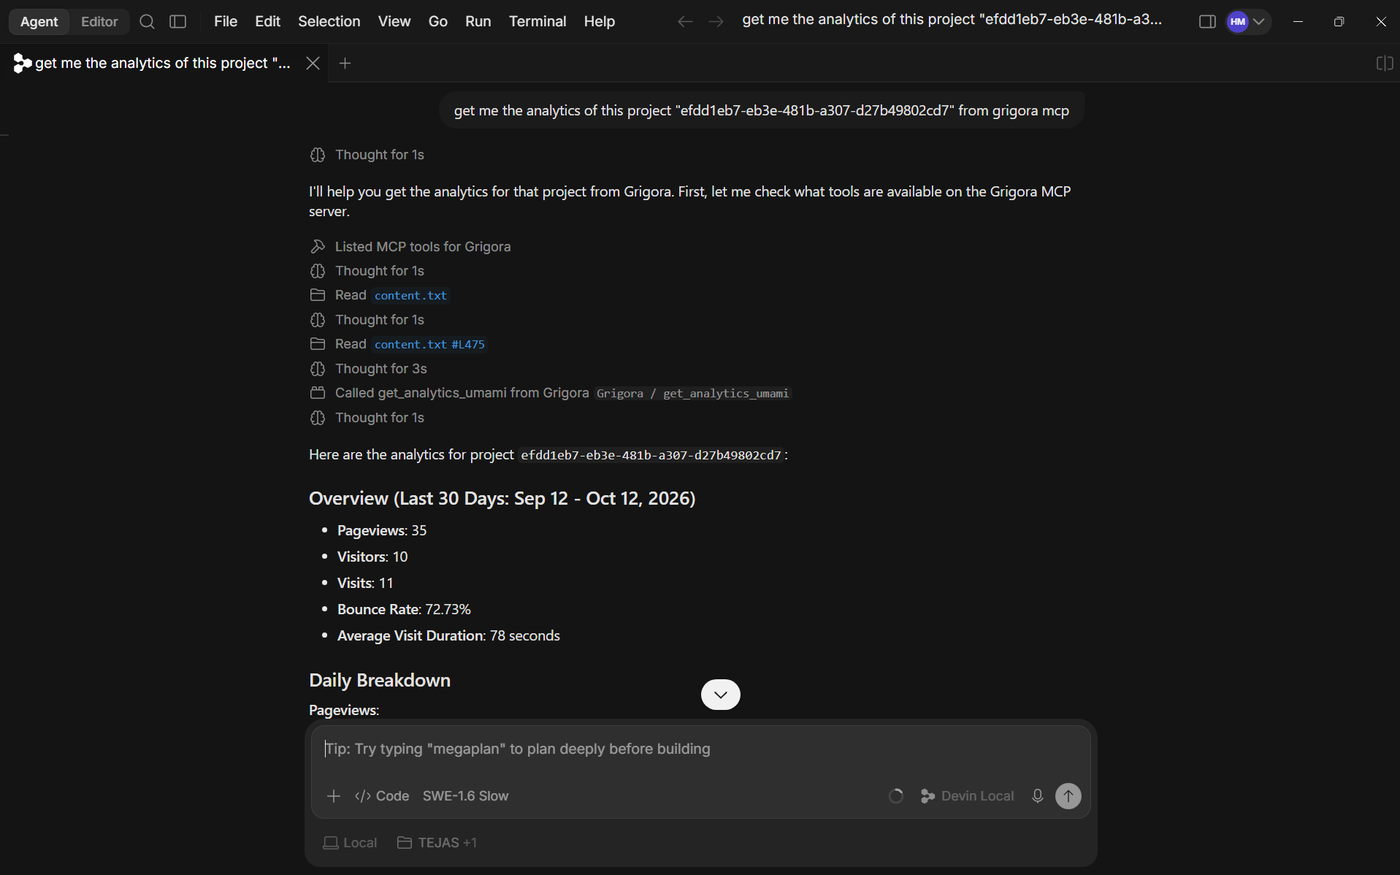
Open the chat or Agent panel in Windsurf / Devin Desktop and enter a prompt to test your connected Grigora tools. For example:
"Show me the projects available in my Grigora account."
The assistant will invoke the connected Grigora MCP tools and return live data directly in the chat.
Troubleshooting
If Grigora MCP does not show as connected or tools do not load:
Re-authenticate: If Grigora still displays Needs auth or Not connected, click Authenticate and complete the browser flow.
Trust Checkbox Required: Make sure you check I recognize and trust this URL before clicking Continue on the first consent page.
Confirm 'Connect' Was Clicked: Ensure you clicked the purple Connect button on the Account connection screen.
Verify Server URL: Ensure the endpoint in
mcp_config.jsonis set tohttps://mcp.grigora.co/mcp.Reload / Restart: Refresh the Windsurf / Devin Desktop window or restart the application to reload MCP connections.
Check Network Access: Confirm your network allows outbound HTTPS connections to
mcp.grigora.co.