

The Grigora App Store is the centralized marketplace and extensions hub built directly into your website management dashboard. It enables you to expand your website's functionality with powerful plugins, third-party platforms, marketing automation tools, analytics suites, and on-site customer widgets—all without writing custom code.
This guide provides a complete walkthrough of navigating the App Store, finding integrations, installing apps to your site, reviewing permissions, configuring app dashboards, leaving feedback, and managing or uninstalling existing extensions.
Navigating to the App Store
To access the marketplace:
Open your Grigora dashboard and select your site.
In the left main navigation sidebar, scroll down to the APP section.
Click App Store (marked by the package cube icon).
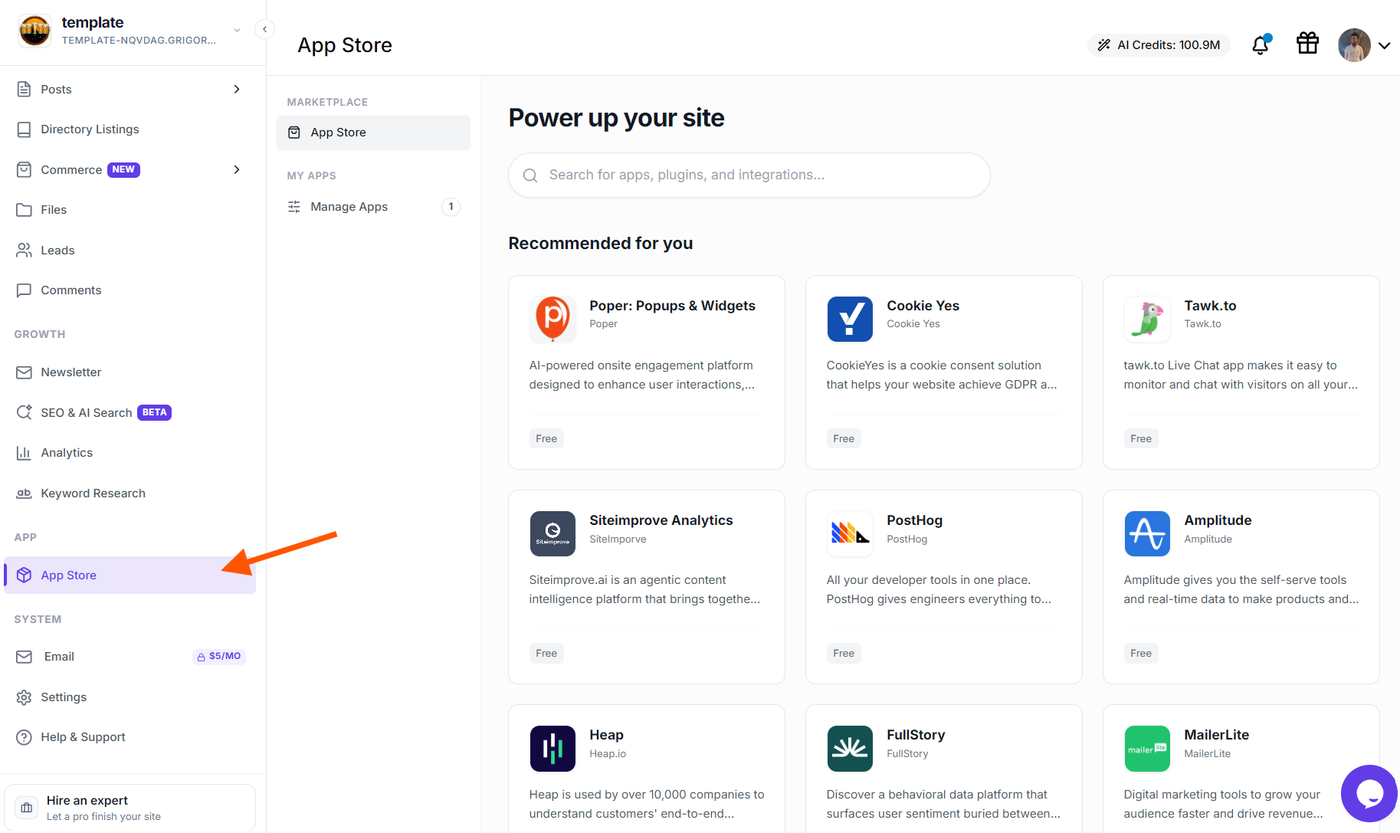
When the App Store loads, you will see a two-column workspace:
Secondary Sidebar (Left Navigation): Features two quick views under MARKETPLACE:
App Store (Shopping bag icon): The public marketplace where you browse and discover new apps.
Manage Apps (Sliders / tuning icon): Shows your currently installed integrations along with a live numeric badge count of active apps on your site.
Main Content View (Right Area): Displays either the marketplace discovery catalog or your installed applications list depending on the selected tab.
Browsing and Searching the Marketplace
Selecting App Store in the secondary sidebar brings you to the Power up your site screen:
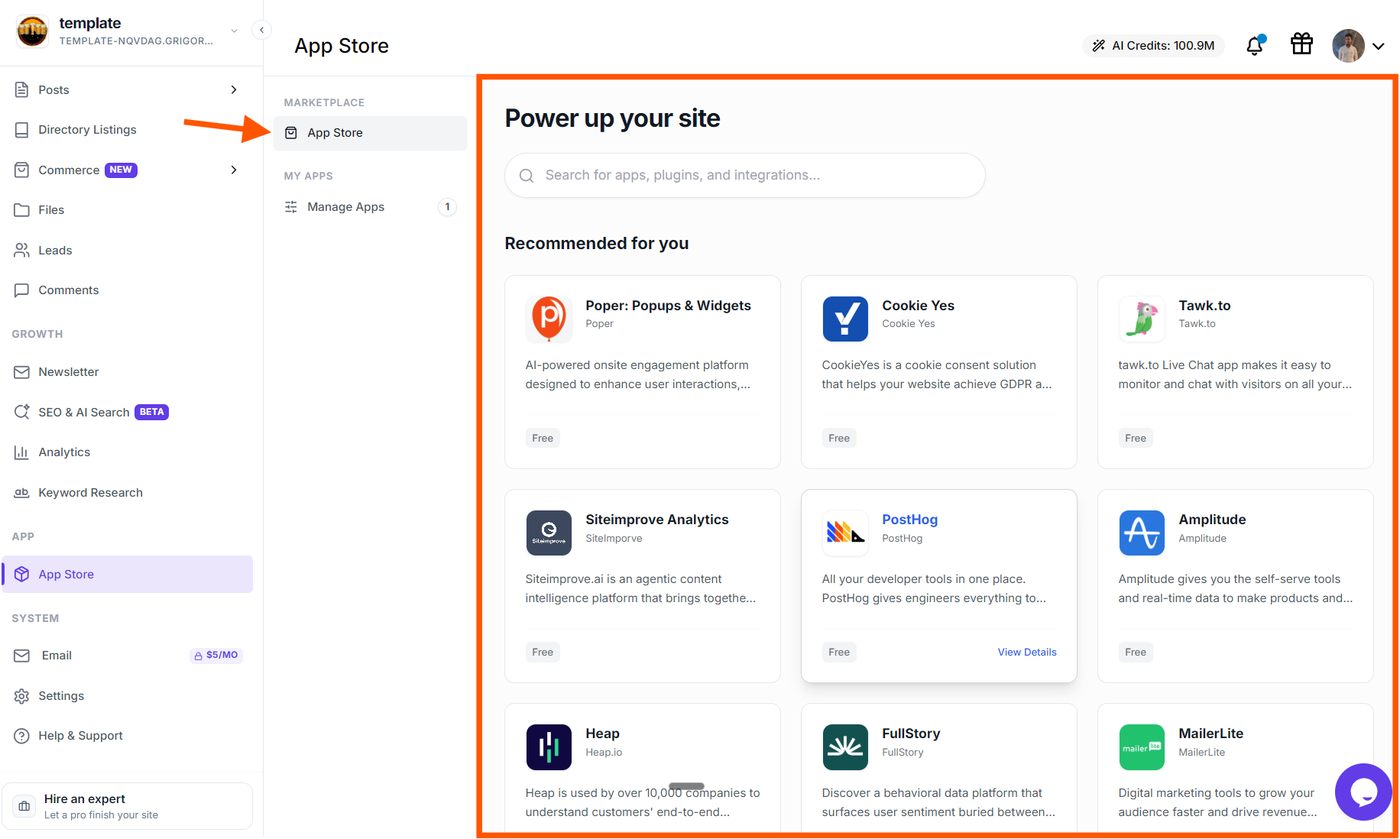
1. Real-Time Search Bar
At the top of the marketplace, locate the prominent search field with the placeholder "Search for apps, plugins, and integrations...".
Type any app name (e.g., Poper, PostHog, Cookie Yes), developer name, or feature keyword.
The catalog updates instantly to show matching results. If no app matches your query, a friendly notice states: "No apps match your search. Try a different term."
2. Recommended for You Grid
Below the search bar, the Recommended for you grid showcases available integrations in clean cards displaying:
App Icon & Name: The visual logo and title of the integration.
Developer Name: The author or publishing company behind the extension.
Star Rating & Review Count: Average star score (out of 5.0) and total approved customer ratings.
App Summary: A two-line overview explaining what the tool does and how it enhances your site.
Pricing Badge: Pricing plan indicator (e.g., Free Plan or tiered pricing).
Hover Prompt: Hovering over any card reveals a blue View Details prompt.
Clicking anywhere on an app card opens the dedicated App Details page.
Exploring App Details
The App Details page provides a comprehensive breakdown of everything the app offers before you install it:
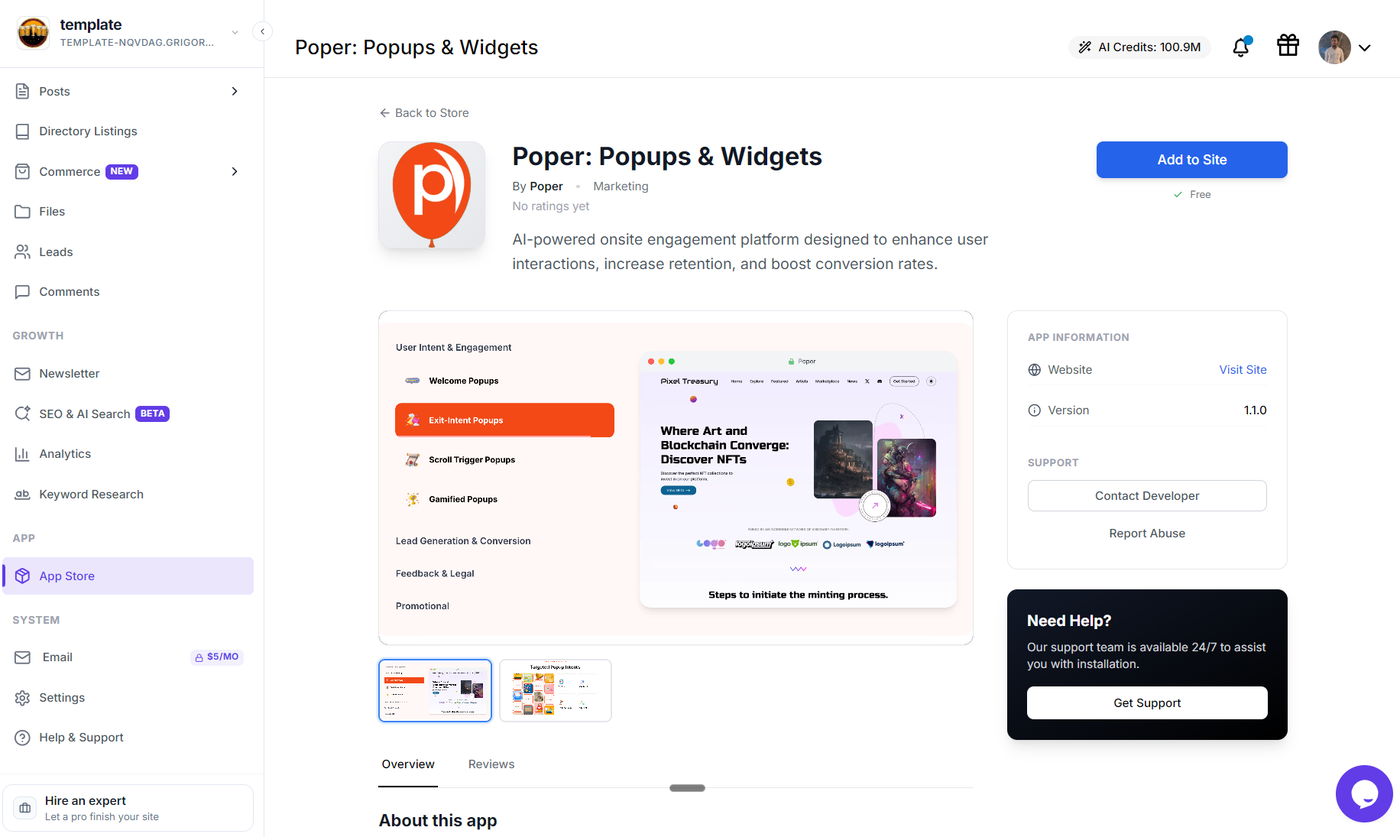
1. Header Information & Action Bar
Back Navigation: Click ← Back to Store in the top left corner to return to the catalog anytime.
App Identity: Displays the high-resolution app icon, app title, developer name, category tag, and aggregate rating.
Install Status / Action Button:
If not installed: Displays a primary blue Add to Site button alongside the plan pricing.
If already installed: Displays a solid green ✓ Installed badge.
2. Interactive Media Gallery
If the developer provides showcase media, an aspect-video gallery appears at the top:
Supports up to 10 screenshots, visual mockups, and demonstration videos.
Click any thumbnail in the bottom slider grid to view that image or play the video directly inside the gallery container.
3. Overview Tab
About this app: Detailed long-form description covering capabilities, use cases, and integrations.
Key Features: A grid of highlighted feature cards with blue lightning zap icons summarizing core functionality.
4. Sidebar App Information & Developer Support
The right column provides verified metadata and direct communication links:
Website: Direct link to visit the developer's official site.
Version: Current release version of the extension.
Contact Developer: Direct email or contact form button to reach the app creator for questions or technical help.
Report Abuse: Quick link to report unauthorized or policy-violating extensions directly to Grigora support.
Need Help? Card: 24/7 Grigora assistance box with a Get Support button.
Installing an App ("Add to Site")
Grigora ensures that apps only access what you explicitly allow through a clear authorization workflow:
On the App Details page, click Add to Site.
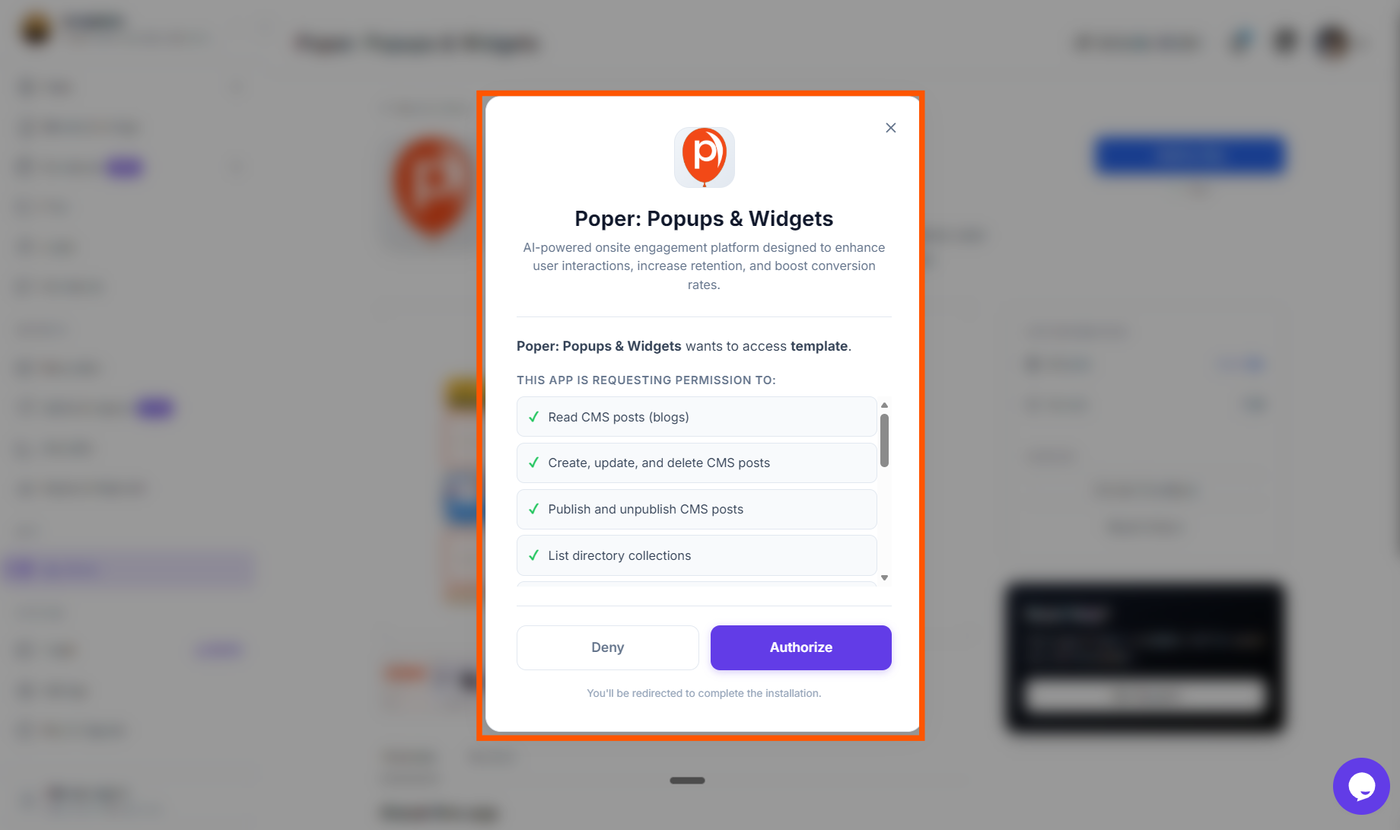
The Authorization Dialog opens on screen:
Confirms that the app wants to connect with your specific site.
Displays This app is requesting permission to: followed by a detailed list of access scopes (e.g., embedding scripts on your site, reading CMS posts, or managing newsletter drafts).
Permission Safety Verification: If the permissions list contains multiple items, a scroll hint appears ("Scroll to see all permissions"). You must scroll through the permissions container to verify access rights before the button activates.
Click Authorize to approve the connection (or Deny to cancel).
Post-Authorization Handling
Once approved, Grigora completes the installation depending on how the app operates:
Embedded Apps: You are redirected directly to the app's full embedded dashboard inside Grigora (
/site/{siteId}/app/{appId}/embed), letting you manage settings without ever leaving your workspace.External Apps: A new tab opens with the provider's configuration setup or dashboard, while your Grigora site remains open.
Background / Script Apps: The integration activates immediately on your site, returning you to the App Store with the app marked as installed.
Managing and Launching Installed Apps
To inspect and control all extensions active on your website:
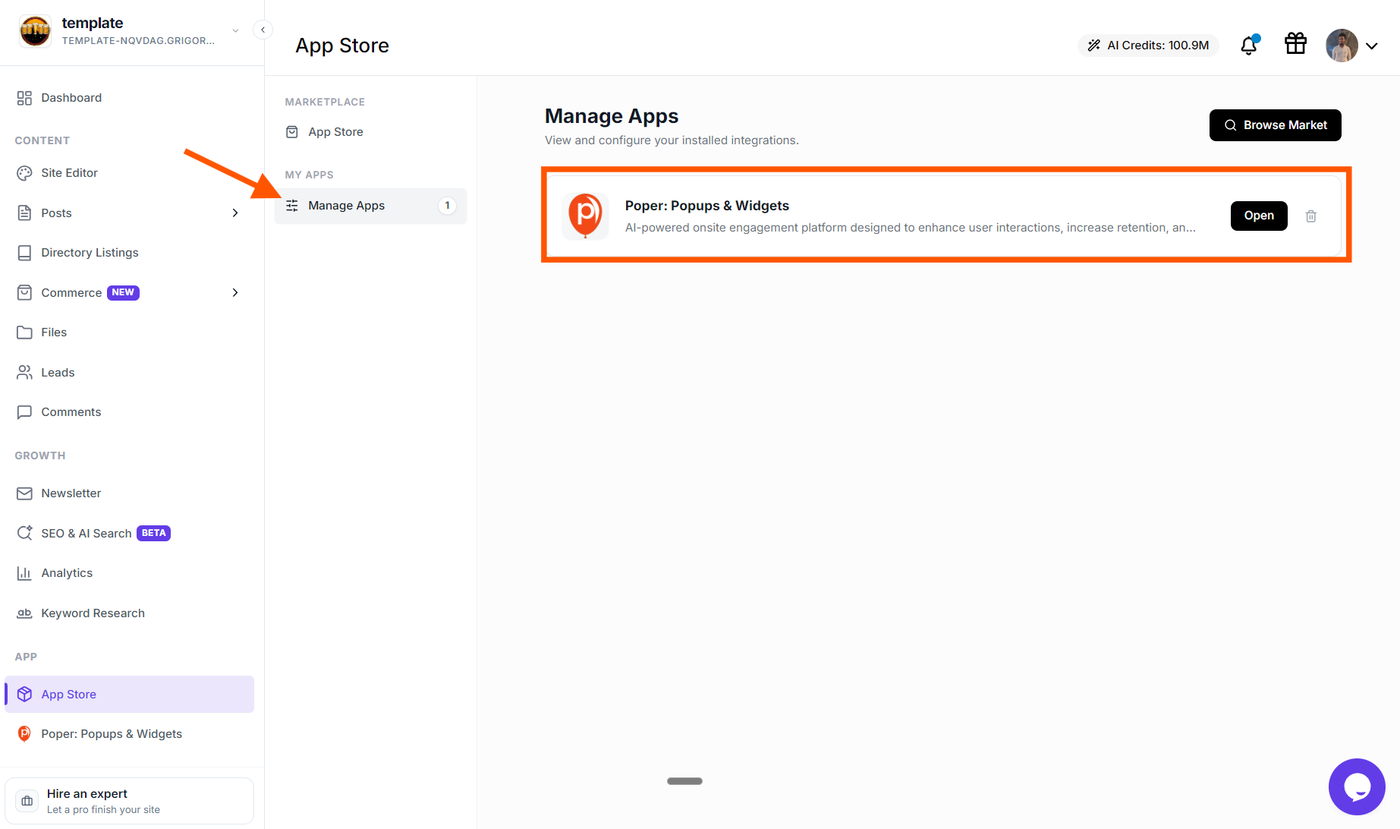
In the App Store secondary sidebar, click Manage Apps.
The header displays Manage Apps with the description: "View and configure your installed integrations."
Installed App Rows
Each active application is presented in a card listing:
App Icon & Name: Clear visual identification.
Description: Short summary of the app's function.
Open Button: For apps that include an embedded or external interface, a dark Open button appears. Clicking it launches the app's dashboard or opens the external service in a new tab.
Uninstall Icon (Trash Can): Located on the far right of the card to remove the application.
If no apps are currently installed, the screen displays a dashed card with a Go to App Store button to help you discover tools quickly.
Sidebar Shortcut for Active Apps
When an installed app features a dedicated dashboard, Grigora automatically surfaces it under the APP section of your left sidebar beneath App Store. You can launch your favorite tools in one click without opening the marketplace each time.
Rating and Reviewing Apps
Community reviews help other site creators select the best extensions and give developers valuable feedback.
Viewing Community Reviews
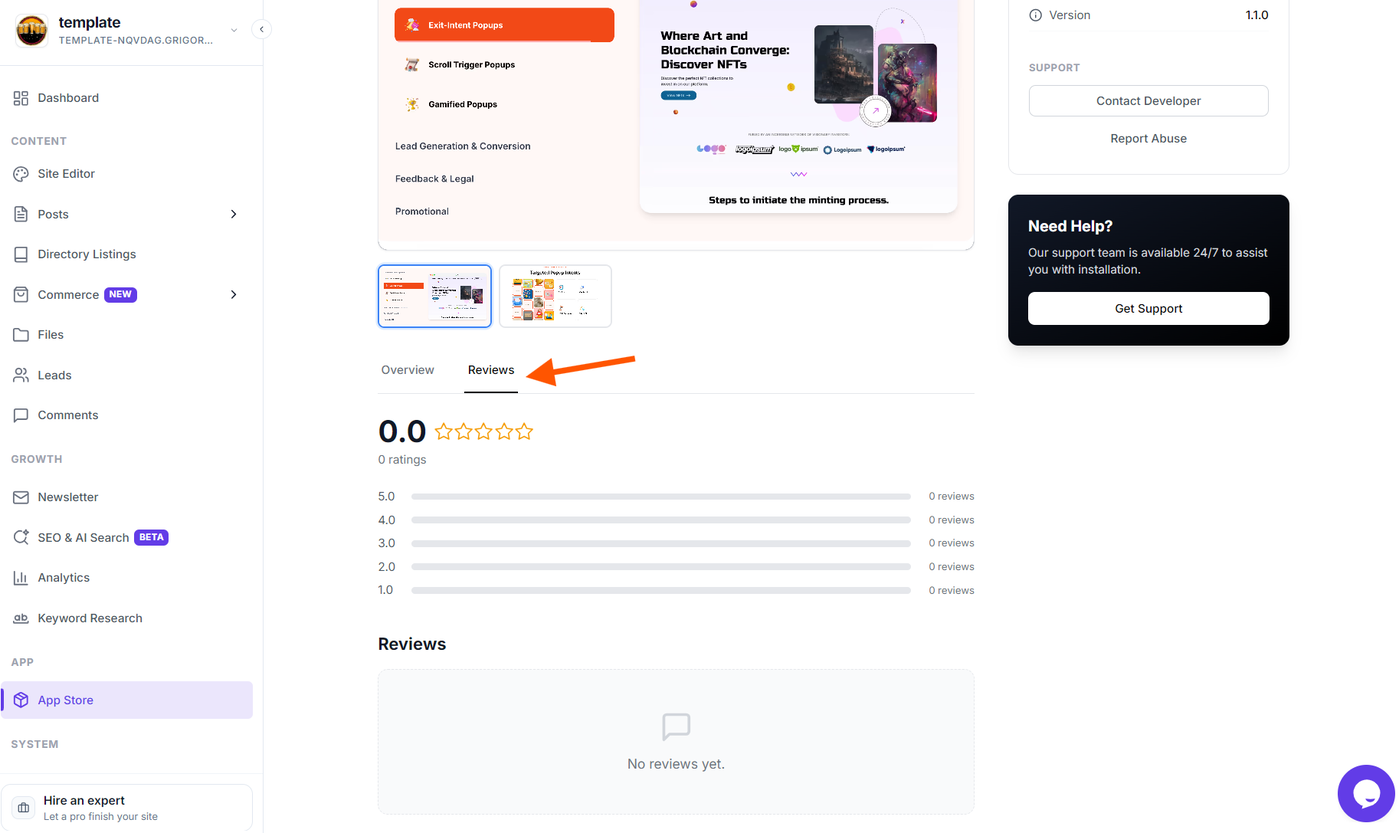
Open an app's details page and click the Reviews tab.
Overall Rating Breakdown: Displays the average score (e.g., 4.8 out of 5), overall star visualizer, total ratings count, and an interactive distribution bar graph showing 5-star down to 1-star distributions.
Reviews Stream: Lists published reviews with reviewer avatar, name, relative submission date (e.g., "2 weeks ago"), star rating, and detailed comments. Click Read more reviews to load additional entries.
Writing Your Review
Once you install an app on your site, a dedicated Write a review box appears under the Reviews tab:
Under Your rating, click the stars (1 to 5) to select your score.
In the Comment (optional) field, type your feedback (e.g., what worked well, tips for other users, or suggestions for the developer).
Click Submit review. A confirmation toast confirms: "Thank you for your valuable feedback."
Managing Your Review
After submitting, your feedback appears in a highlighted Your review card at the top of the reviews section. If you wish to retract your review:
Click Delete review in your review card.
A confirmation dialog appears: "Delete your review? This will permanently remove your review. You can submit a new review later if you want."
Click Delete review to remove it.
Uninstalling an App
If you no longer need an integration or want to remove an app from your site:
Navigate to App Store → Manage Apps.
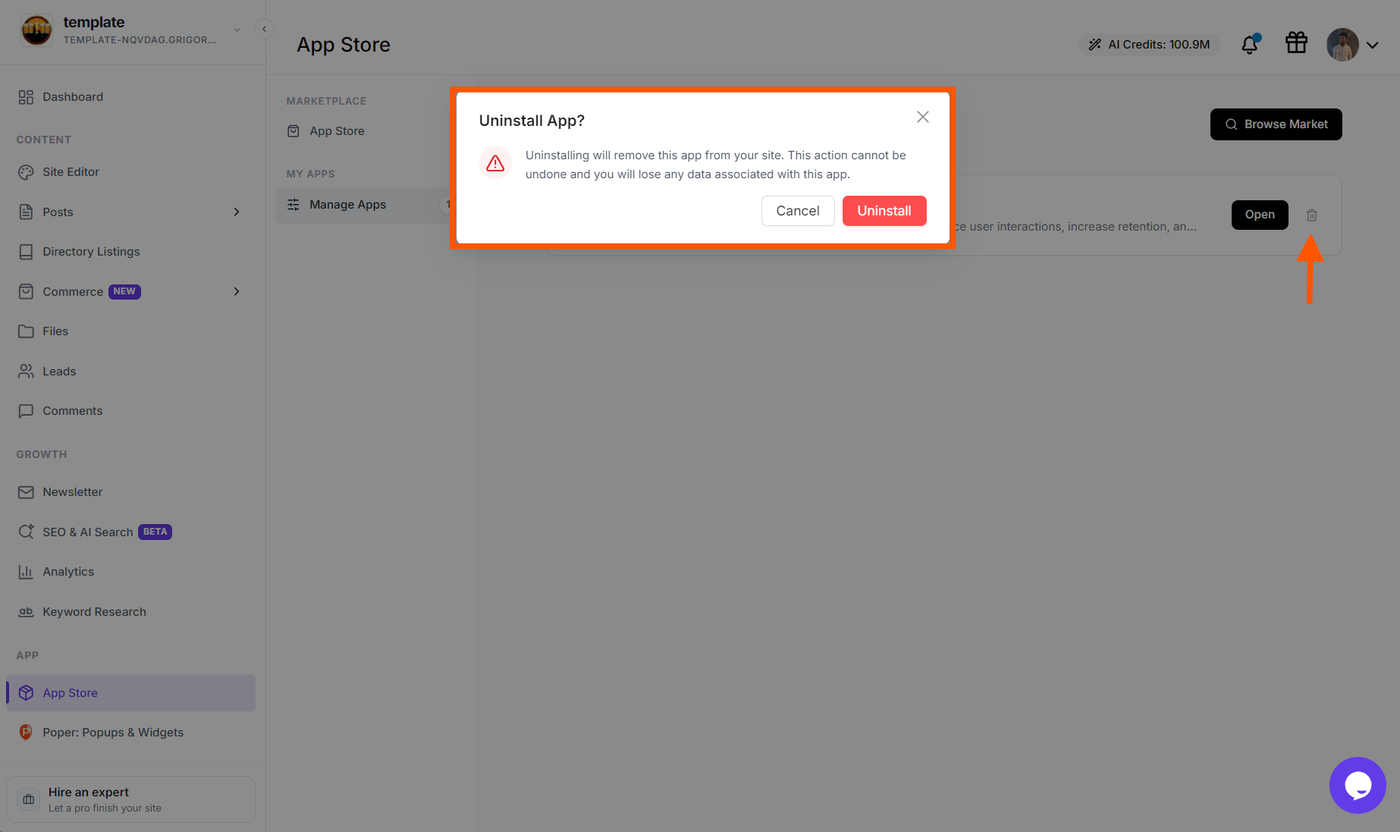
Find the app you wish to remove and click the Trash can icon on the right.
The Uninstall App? modal appears with an alert icon:
"Uninstalling will remove this app from your site. This action cannot be undone and you will lose any data associated with this app."
Click the red Uninstall button to confirm (or Cancel to keep the app).
Grigora immediately uninstalls the extension, detaches its permissions, cleans up embedded scripts, and updates your installed count.
Best Practices for Site Extensions
Check Permissions Carefully: Always review the requested scopes in the authorization modal to ensure the app requests only what is necessary for its functionality.
Use the Dedicated Embedded Dashboard: Whenever available, take advantage of the embedded dashboard inside Grigora to manage settings without context switching.
Audit Installed Apps Periodically: Visit the Manage Apps tab regularly to uninstall tools you are no longer actively using to keep your dashboard clean and maximize site performance.