

By default, Grigora lets you send newsletters instantly using its shared sending domain. However, connecting your own Custom SMTP allows you to send campaigns directly from your personal or business email address, build your own sender reputation, and lift the 1,000-subscriber limit of the shared domain.
In this guide, you will learn how to connect a custom SMTP server in Grigora. We will walk through the entire setup using Gmail and Google Workspace as our primary example—including how to generate a secure Google App Password, configure SMTP ports and encryption, set sending rate limits, and test your connection.
📌 Example Provider Notice
This guide demonstrates how to connect Custom SMTP in Grigora using Gmail & Google Workspace as a practical example. However, Grigora supports any standard SMTP email service or custom mail server of your choice. You can connect whatever email service you want—simply enter your provider's specific SMTP host, port, username, and password when configuring the connection.
Why Connect Custom SMTP?
Send From Your Own Email Address: Newsletters arrive from
you@gmail.comoryou@yourdomain.cominstead of a shared domain.Build Direct Sender Reputation: Maintain control over your domain deliverability and inbox placement.
No Shared Domain Caps: Send beyond the default 1,000-recipient limit on Grigora's shared domain, subject only to your email provider's daily quota.
Step 1: Generate a Google App Password
Google does not allow third-party apps to authenticate directly with your standard Gmail password. For security, you must create a dedicated 16-character App Password.
Note: You must have 2-Step Verification (2FA) enabled on your Google account before Google will allow you to generate an App Password.
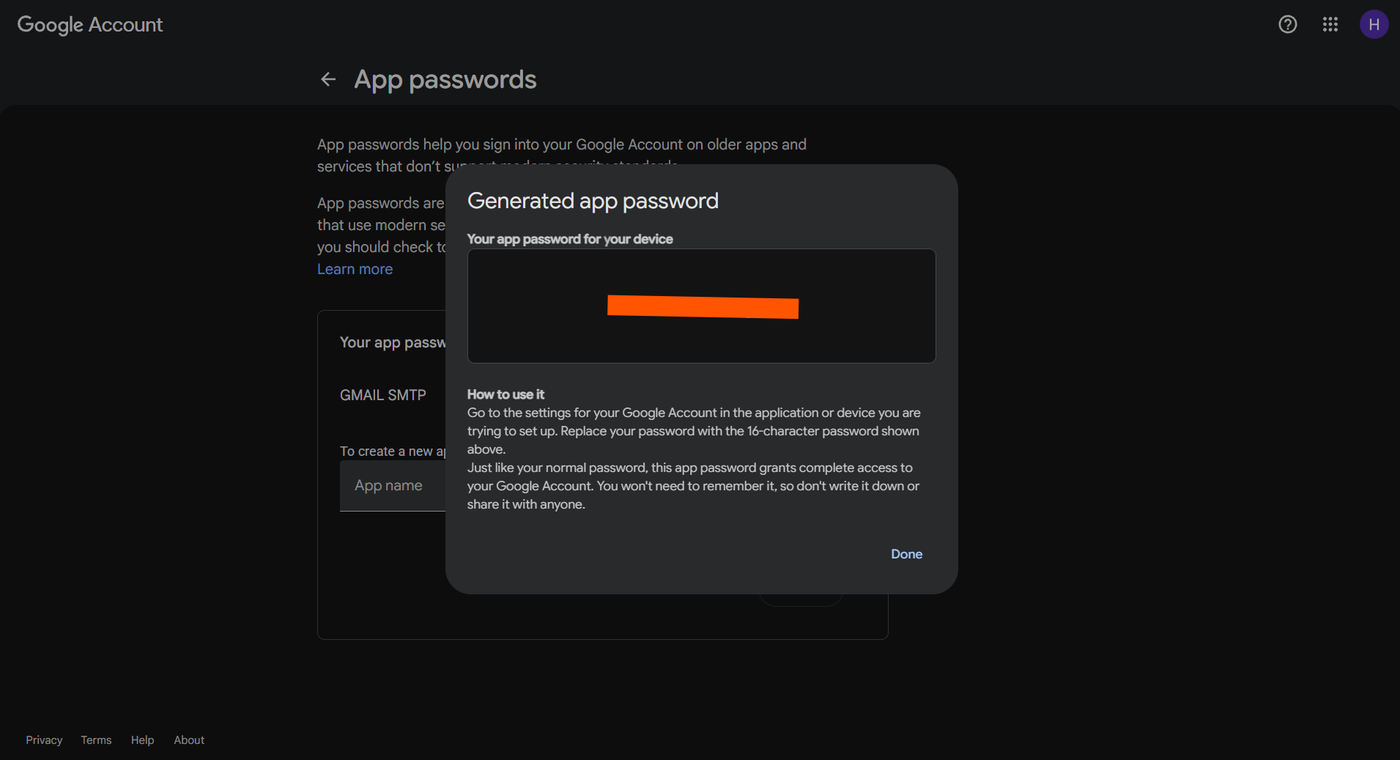
Go to your Google Account settings.
Search for App passwords .
In the "App name" field, enter a recognizable label like
Grigora Newsletter, then click Create.Google will display a unique 16-character passcode (e.g.,
abcd efgh ijkl mnop). Copy this password or keep the window open. You will not see it again once dismissed.
Step 2: Access Sending Connections in Grigora
Once you have your App Password ready, head over to your Grigora dashboard:
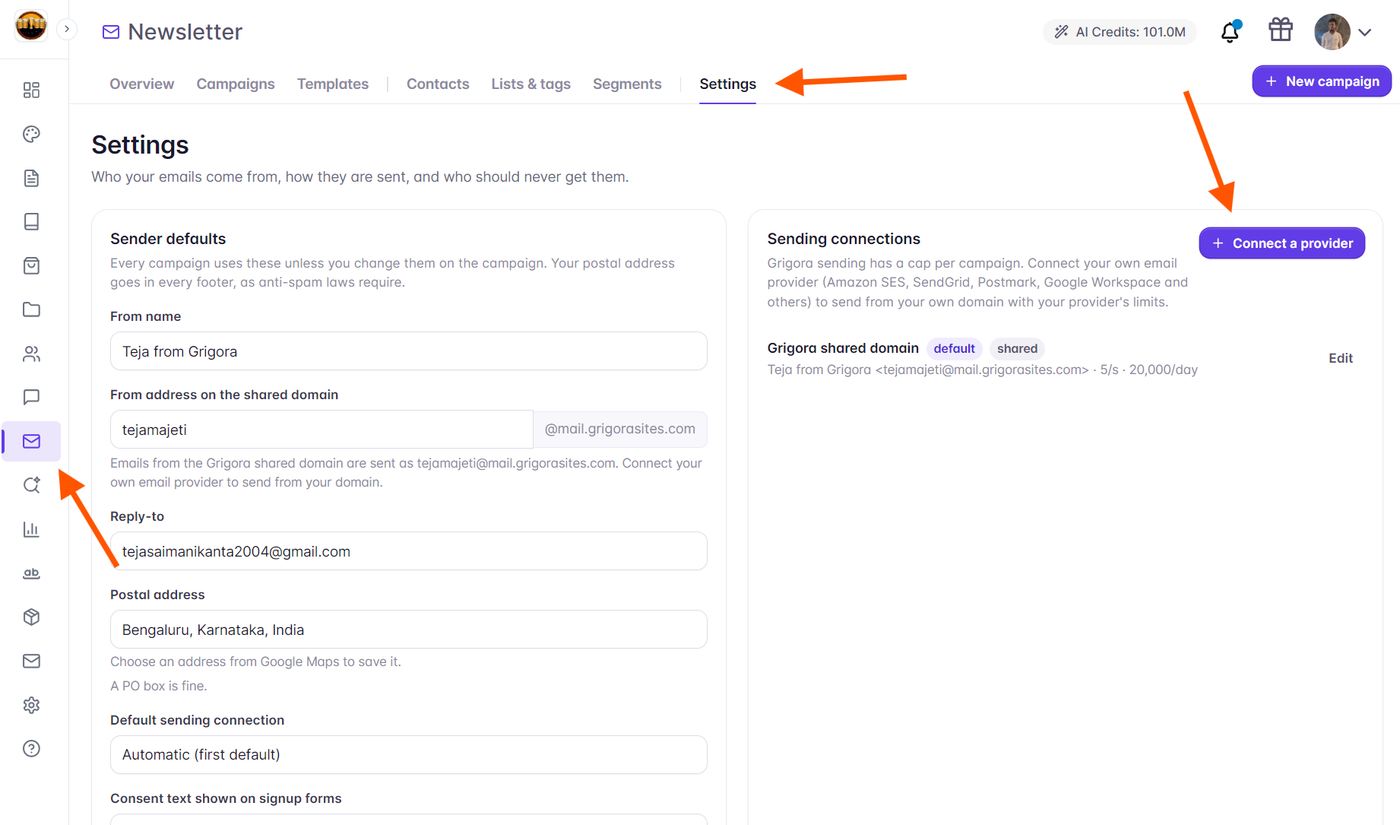
From the dashboard sidebar, click on Newsletter.
Click on the Settings tab in the top navigation strip.
Click the Connect a provider button in the top-right corner of the Sending connections card.
Step 3: Configure the Gmail SMTP Settings
A modal will appear prompting you for your connection details. Fill in the fields as follows:
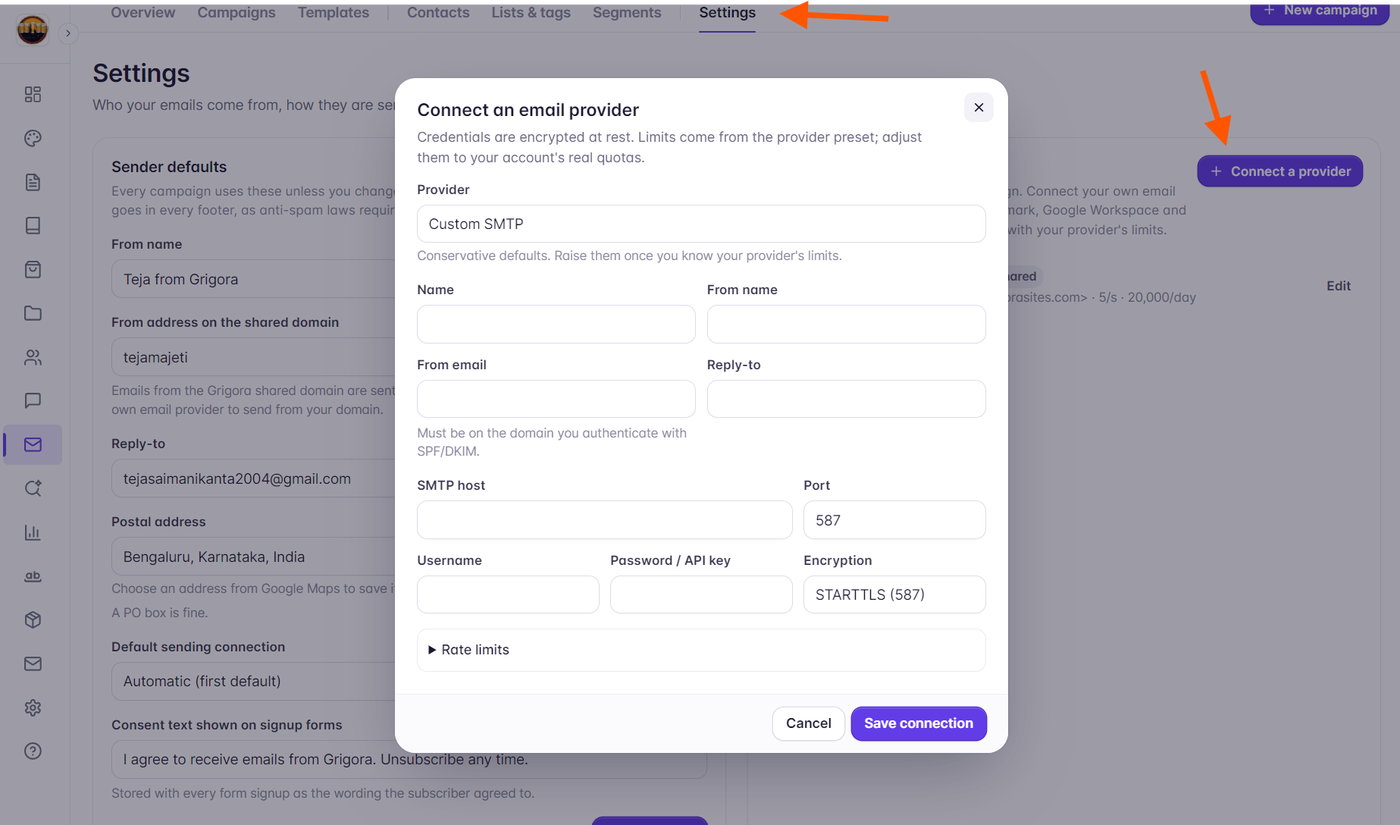
Field | Recommended Value | Explanation |
|---|---|---|
Connection Name |
| An internal label to help you identify this provider in Grigora. |
Provider |
| Select Generic SMTP from the provider list. |
SMTP Host |
| Google's official outgoing mail server address. |
SMTP Port |
| Port 587 is standard for STARTTLS; Port 465 is for SSL/TLS. |
Encryption / TLS Mode |
| Secures outgoing traffic between Grigora and Google servers. |
SMTP Username |
| Your complete Gmail or Google Workspace email address. |
SMTP Password |
| The Google App Password you generated in Step 1 (remove any spaces). |
From Email |
| Must match your authenticated Gmail address. |
From Name |
| The sender name displayed in recipients' inboxes. |
Reply-To |
| (Optional) Address where subscriber replies will be sent. |
Step 4: Setting Rate Limits (Google Quotas)
Google enforces strict sending limits to prevent spam:
Free Personal Gmail accounts: Maximum 500 emails per rolling 24 hours.
Google Workspace accounts: Maximum 2,000 emails per rolling 24 hours.
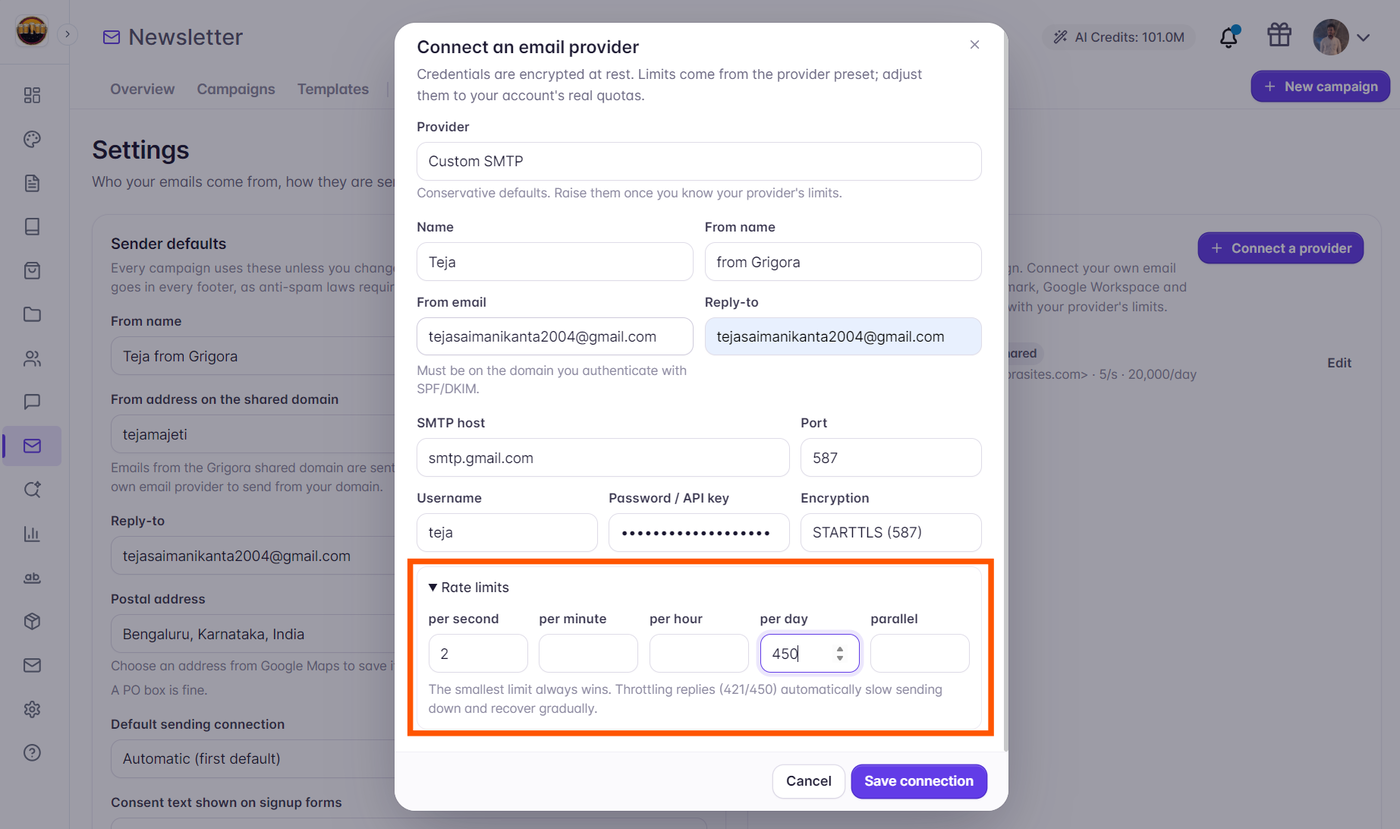
Inside the connection modal, you can optionally configure rate limits to ensure Grigora respects Google's quotas:
Rate per second: e.g.,
2(throttles dispatch to avoid rate-limiting spikes).Rate per day: Set to
450for personal Gmail (leaving headroom for regular emails) or1800for Workspace accounts.
Step 5: Save and Set as Default
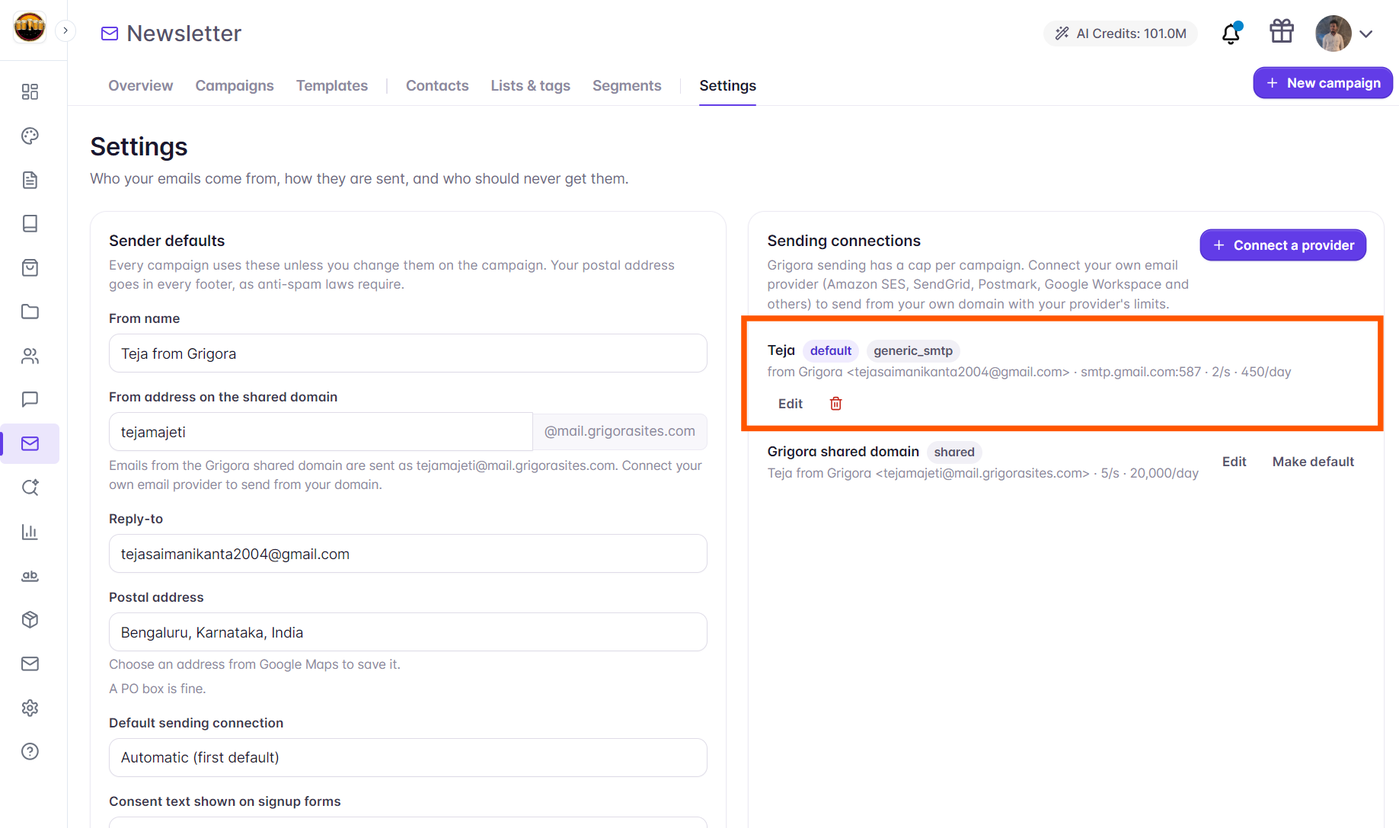
Click the purple Save connection button in the modal.
Once saved, your connection will appear in the Sending connections list.
Click Make default next to your new connection. Grigora will display a purple default badge next to it, ensuring all future campaigns automatically send through your Gmail SMTP connection.
Step 6: Send a Test Email
Before launching a live campaign to your subscriber list, send a test email to verify that your credentials and encryption are operating properly:
Navigate to Newsletter > Campaigns and click New campaign.
On Step 3 (Content / Composer), click the Send test button in the top toolbar.
Enter your personal email address and click Send test email.
Open your inbox and check the test message. Verify that the From Name and From Address display your custom Gmail address and that delivery was successful.
Troubleshooting Common SMTP Issues
Authentication Error (535 / Invalid Credentials):
Ensure you entered the 16-character Google App Password, not your regular account password. Double-check that 2-Step Verification is still active on your Google account.
Connection Timed Out:
Verify that your port matches your TLS mode: use
587withSTARTTLS, or465withTLS.Daily Limit Reached (550 / Quota Exceeded):
If you attempt to send more than 500 emails in a day from a personal Gmail account, Google will pause sending for 24 hours. Consider upgrading to Google Workspace or configuring an enterprise Google Workspace SMTP account with higher daily sending allowances.
Next Steps
Your custom SMTP connection is now live and ready to power your newsletter broadcasts! Continue building your email marketing setup with these guides:
How to Import Contacts into Grigora Using the CSV Import Wizard
How to Create an Email Campaign: The Complete 4-Step Walkthrough
How to Design High-Converting Newsletters with the Drag-and-Drop Composer