

Targeted audience segmentation allows you to send focused, relevant content to the exact subscribers who want it. In Grigora, dynamic segments keep themselves automatically up to date as subscribers sign up, interact with your campaigns, or update their profile data.
To build effective segments, it is essential to understand the subscriber data structure in Grigora: what built-in fields every contact has out of the box, how engagement is recorded, and how user-defined Custom fields expand your targeting options.
This guide explains all supported subscriber fields, walks you through segmentation by Recency, Activity, and Custom Fields, and shows you how to combine multi-condition rules.
Understanding Subscriber Fields in Grigora
Whenever you build a segment in Grigora (via Newsletter > Segments > + New segment), the rule builder organizes available subscriber attributes into four distinct field groups:
Field Group | Available Fields | Description |
|---|---|---|
Contact |
| Standard profile attributes recorded for every contact in your database upon signup, import, or interaction. |
Custom fields | User-defined attributes (e.g., | Created under Newsletter > Settings > Custom fields to track specialized subscriber data. |
Membership |
| Target based on subscription lists, assigned tags, or membership in other dynamic segments. |
Engagement |
| Target based on automated campaign delivery, open, and click tracking. |
How Custom Fields Work for Newsletter Subscribers
Every newsletter contact in Grigora comes with standard profile fields. When your business needs to record unique attributes—such as a subscriber's membership tier, hometown, or account type—you configure them as Custom fields.
1. Creating Custom Fields in Settings
Navigate to Newsletter in your dashboard sidebar and click the Settings tab.
Scroll down to the Custom fields card ("Store anything about a contact (plan, city, birthday…). Use them in segments and as merge tags: {{ contact.plan }}").
Click + Add field.
Enter a Label (e.g., Plan), a Key for merge tags (e.g.,
plan), and select the Type:Dropdown (enum): Predefined comma-separated options (e.g.,
Free, Pro, Enterprise).Text: Free-form text strings (e.g.,
city,company_name).Number: Mathematical numeric values (e.g.,
order_count,score).Date / Datetime: Calendar dates (e.g.,
birthday,renewal_date).Boolean: Simple Yes/No toggles (e.g.,
is_wholesale).
Click Save.
Once saved, custom fields immediately appear under the Custom fields category in the segment rule builder and are available as merge tags inside the email composer.
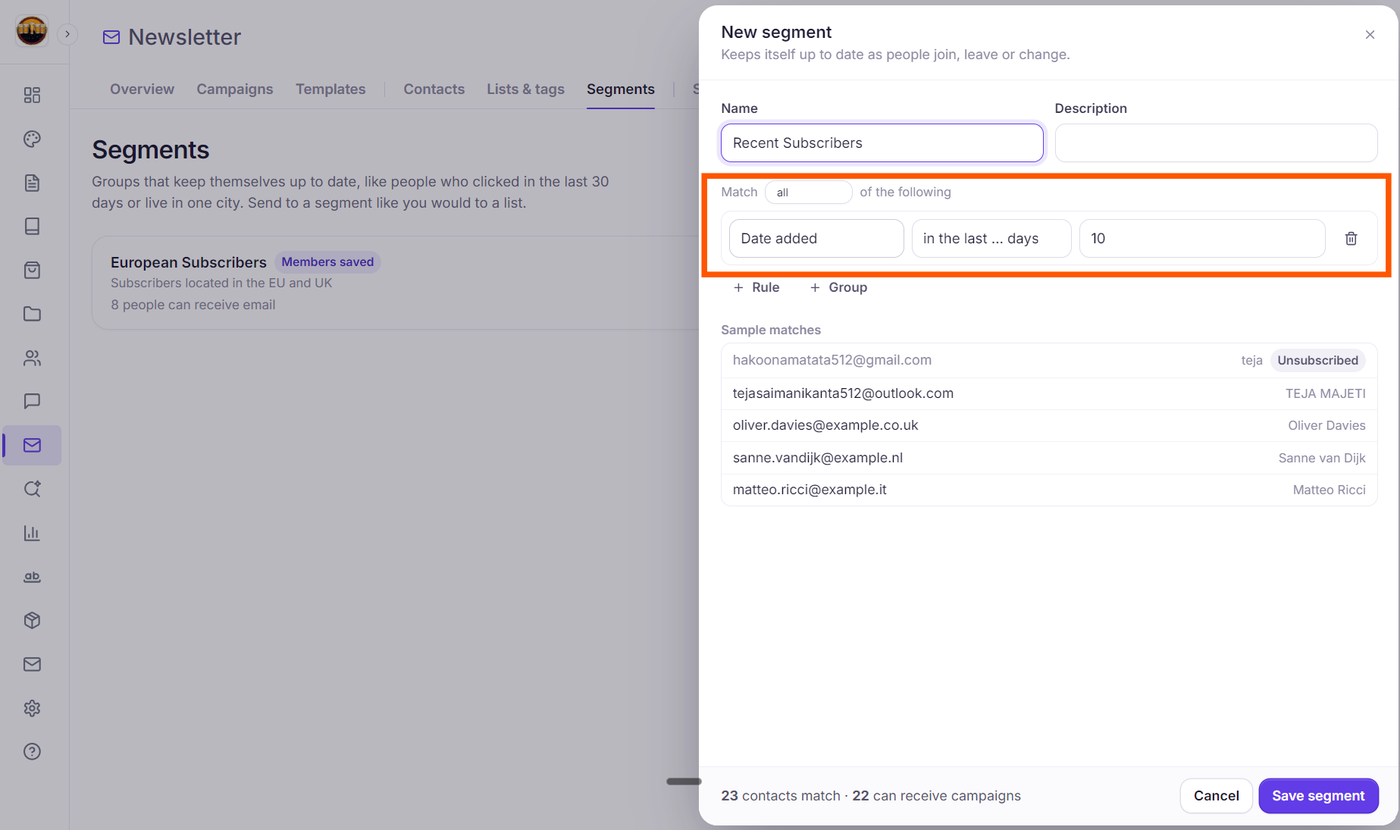
1. Recency Segmentation: Targeting by "Date Added"
When you want to segment subscribers based on when they joined your newsletter, use the built-in Date added field (found under the Contact field group).
Recipe: New Subscriber Welcome Cohort (Last 14 Days)
To reach recent signups with onboarding guides or welcome promotions:
In the rule row, click the field dropdown and select Date added (under Contact).
In the operator dropdown, select in the last … days.
In the value box, enter
14.
How it works: Anyone who joined within the last two weeks is automatically included. On day 15, they seamlessly roll out of this segment.
Visual Output: The footer metric updates immediately: {N} contacts match · {N} can receive campaigns.
Recipe: Established / Long-Term Subscribers
To reward subscribers who have been with you for over six months:
Select field Date added.
Select operator not in the last … days.
Enter
180days.
2. Activity & Engagement Segmentation
Grigora tracks reader behavior across all broadcasts. Under the Engagement and Contact field groups, you can target subscribers based on recent opens, clicks, or general dormancy.
Recipe A: Re-Engaging Inactive / Lapsed Readers
Win back subscribers who have stopped opening your emails before deliverability is impacted:
Click + Rule.
Select field Opened any email (under Engagement) or Last engaged (under Contact).
Select operator not in the last … days.
Enter
60(or90) days.
Result: Captures contacts who have not opened any broadcast in the specified period—ideal for a re-engagement check-in.
Recipe B: Highly Engaged Clickers
Find your most active readers who clicked links in your newsletters:
Select field Clicked any email (under Engagement).
Select operator in the last … days.
Enter
30days.
Result: Gathers subscribers who demonstrated high interest by clicking email links in the past month.
Recipe C: Specific Campaign Engagement
Follow up with contacts based on their interaction with a specific broadcast:
Select field Opened campaign or Clicked campaign.
Select operator did (or did not).
Choose the campaign from the dropdown menu (or leave as any campaign).
(Optional) Enter an age limit in the days (optional) field.
3. Custom Fields Segmentation
Custom fields you created in Newsletter Settings allow you to target specialized audience segments with type-specific operators:
Recipe A: Dropdown Fields (e.g., Plan Tier)
If you track customer tiers using an enum dropdown (such as plan):
Under the Custom fields group, select Plan.
Select operator is.
Choose the target option from the value dropdown (e.g., Pro or Enterprise).
Recipe B: Text Fields (e.g., City or Company Name)
If you collect subscriber location or company details:
Select your custom text field (e.g., City).
Select operator: is, is not, contains, does not contain, starts with, ends with, is set, or is empty.
Enter a value (e.g., London), or select is set to include anyone who has filled out that attribute.
Recipe C: Number Fields (e.g., Order Count)
If you track customer order numbers or scores:
Select your custom number field (e.g., Order count).
The operator dropdown provides direct mathematical comparison symbols:
> (greater than)
≥ (greater than or equal to)
< (less than)
≤ (less than or equal to)
= (equals)
≠ (does not equal)
is set / is empty
Select ≥ and enter
5.
Recipe D: Boolean Fields (e.g., Wholesale Partner)
For binary subscriber attributes:
Select your custom boolean field.
Choose operator is yes, is no, or is empty.
Combining Rules: "Match All" vs. "Match Any"
Above your rule list, Grigora lets you configure how rules interact:
Match all of the following (AND logic): Every condition must be satisfied. For example:
Date added in the last … days 30
AND
Clicked any email in the last … days 30This identifies newly added subscribers who are already clicking your links.
Match any of the following (OR logic): A subscriber is included if at least one rule matches. For example:
Tag has tag vip
OR
Plan is EnterpriseNested Groups (+ Group): Click + Group to add multi-level logic (e.g., requiring a subscriber to be on your Main Newsletter list AND match either of two interest tags).
Audience Verification: Matching vs. Sendable Counts
As you add or adjust rules in the segment drawer, Grigora automatically queries your contact database:
Footer Metric: Displays {N} contacts match · {N} can receive campaigns (or 1 contact matches · 1 can receive campaigns). While computing, it shows Counting….
Sample Matches Table:
Deliverable contacts: Shown in crisp dark text with email and name.
Non-sendable contacts: Shown in muted gray text with a slate badge pill explaining why campaigns skip them (e.g., Not confirmed yet, Unsubscribed, Bounced, Marked as spam, or On the do-not-send list).
When you click Save segment, the segment appears on your Segments page with the metric {N} people can receive email and a Members saved status badge. It is immediately available in Step 2: Audience of the Campaign Builder.
Next Steps
Understanding "Contacts Match" vs. "Sendable Contacts" in Grigora Segments
How to Target the Right Audience: Including and Excluding Lists, Tags, and Segments
How to Create an Email Campaign in Grigora: The Complete 4-Step Walkthrough
How to Manage Suppressed Contacts, Spam Complaints, and Hard Bounces