

Every business collects specialized subscriber information. A software product might need a subscriber's Plan or Company name, while an online store might track City, Birthday, or Order count.
In Grigora, you can define Custom fields to capture, store, and utilize custom contact attributes. These fields can be collected through website signup forms, mapped in CSV imports, used to build dynamic audience segments, and inserted as merge tags in email campaigns.
Supported Custom Field Types
Grigora supports seven field data types under Newsletter > Settings > Custom fields:
Type | Example Use Cases | Supported Segment Operators |
|---|---|---|
Dropdown (enum) |
| is, is not, is set, is empty |
Text |
| is, is not, contains, does not contain, starts with, ends with, is set, is empty |
Number |
| =, ≠, >, ≥, <, ≤, is set, is empty |
Date |
| in the last … days, not in the last … days, before, after, is set, is empty |
Datetime |
| in the last … days, not in the last … days, before, after, is set, is empty |
Boolean |
| is yes, is no, is empty |
URL |
| is, is not, contains, does not contain, starts with, ends with, is set, is empty |
Creating a Custom Field in Settings
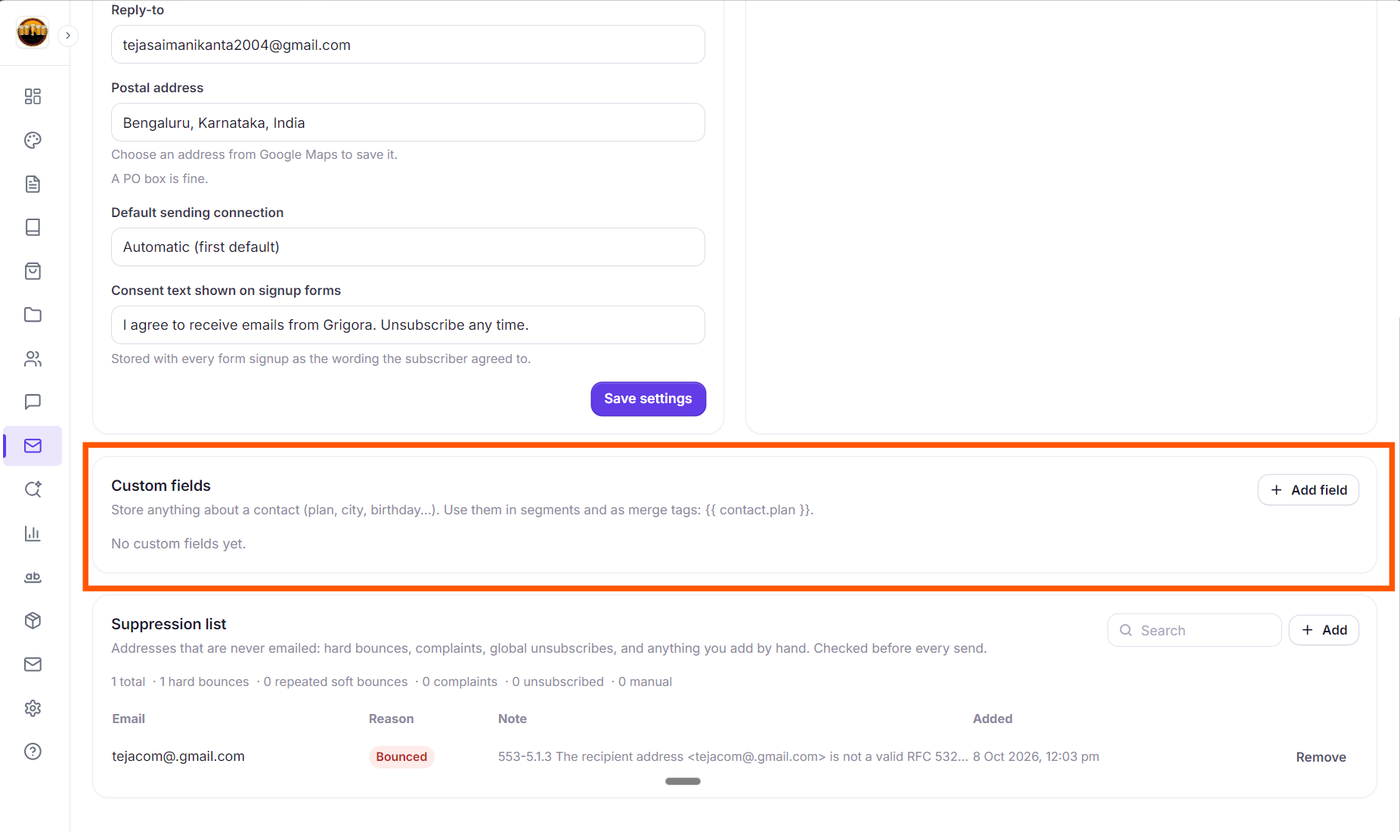
Navigate to your Grigora dashboard and click Newsletter.
In the top sub-navigation bar, click on Settings.
Scroll down to the Custom fields card ("Store anything about a contact (plan, city, birthday…). Use them in segments and as merge tags: {{ contact.plan }}").
Click the + Add field button.
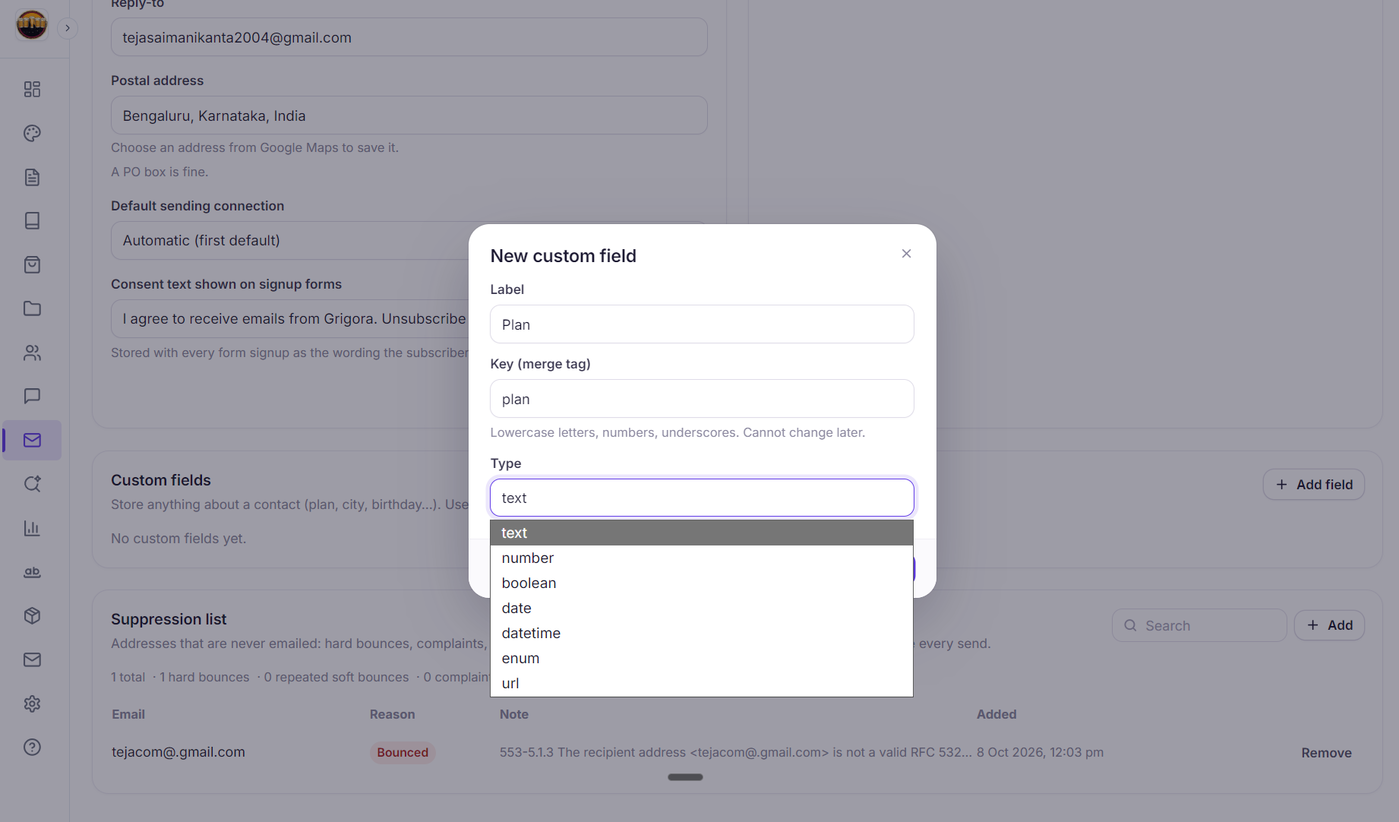
In the New custom field modal, configure the field:
Label: The human-readable name displayed in contact cards and forms (e.g., Plan).
Key (merge tag): The identifier used for merge tags and automation (e.g.,
plan). Uses lowercase letters, numbers, and underscores, and cannot be changed later.Type: Select from text, number, boolean, date, datetime, enum, or url.
Options (comma separated): If enum is selected, enter your allowed choices (e.g.,
Free, Pro, Enterprise).
Click Save.
How to Populate Custom Fields
Website Signup Forms: Custom fields can be connected to input blocks on your website pages to collect data when visitors subscribe.
CSV Import Wizard: When uploading contacts via CSV (under
Newsletter > Contacts > Import), map columns directly to your custom fields.Contact Details Drawer: Click any subscriber in
Newsletter > Contactsto view their profile drawer and update custom fields manually.
Using Custom Fields in Personalization (Merge Tags)
Every custom field you create generates an official merge tag following the syntax: {{ contact.key }}.
Inside the visual email composer, click the Merge tags toolbar button to view your custom tags, or type them directly into headings, text blocks, and button text:
"Hello {{ contact.first_name }}, your current {{ contact.plan }} plan expires soon!"
Grigora dynamically replaces the merge tag with the subscriber's saved attribute at the moment of send.
Next Steps
How to Segment Subscribers Based on Activity, Recency, and Custom Fields
How to Use Merge Tags to Personalize Emails with Subscriber Data
How to Target the Right Audience: Including and Excluding Lists, Tags, and Segments
How to Import Contacts into Grigora Using the CSV Import Wizard