

Welcome to email marketing in Grigora! Whether you are a creator sharing your latest blog posts, an e-commerce store promoting new products, or a business nurturing leads, Grigora provides a complete, built-in email marketing platform directly inside your website dashboard. You do not need third-party email tools, complex integrations, or manual subscriber synchronization.
This comprehensive guide walks you through everything you need to know to get started: understanding the dashboard layout, configuring your sender details, managing your audience, designing professional campaigns with the visual drag-and-drop composer, and tracking real-time delivery analytics.
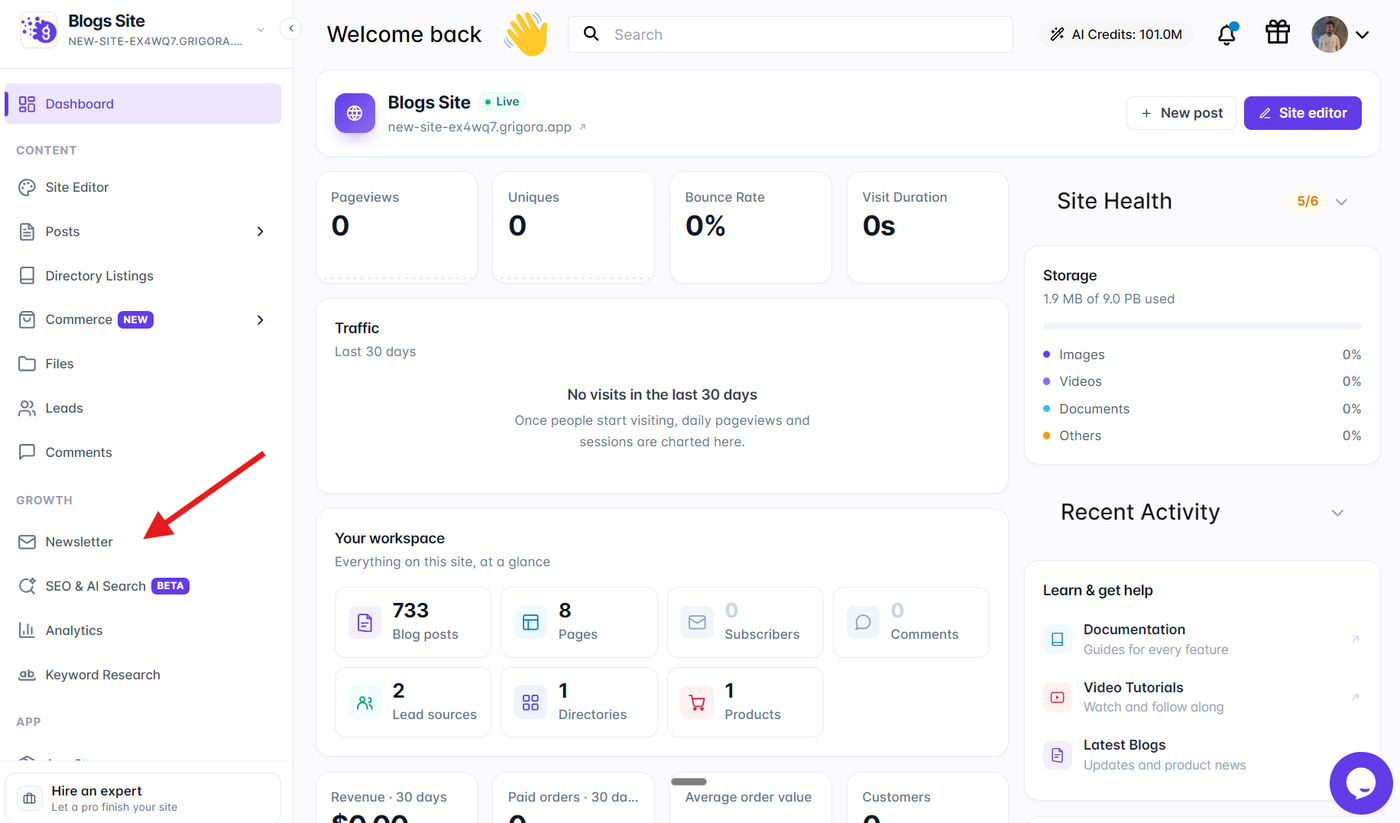
Navigating to the Newsletter Section
To access the email marketing suite in Grigora:
Log in to your Grigora dashboard and select your website project.
In the left-hand sidebar menu, click on Newsletter.
You will land on the primary email marketing dashboard.
Understanding the Three Pillars of Grigora Newsletters
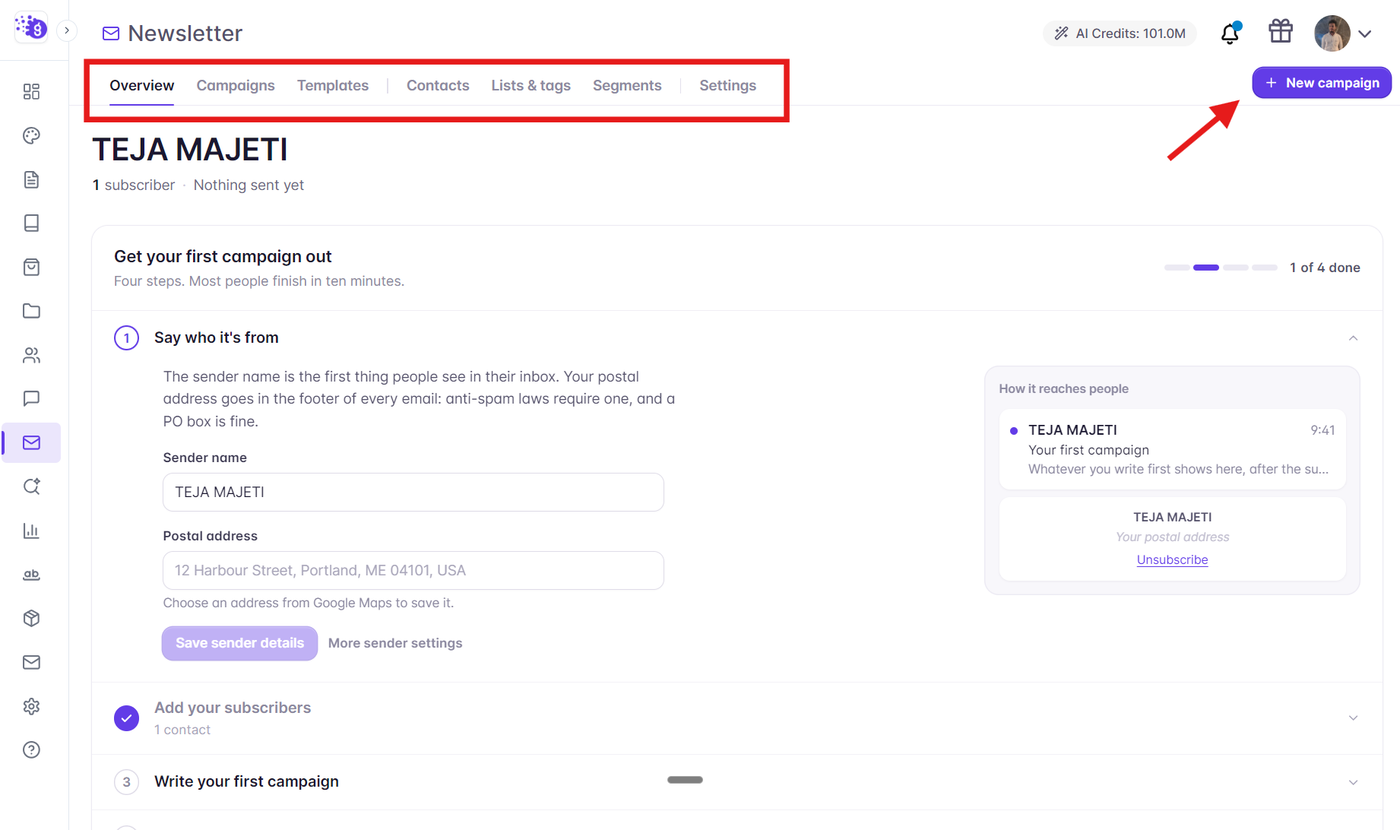
Grigora organizes email marketing into three core areas that match how you work:
What You Send:
Overview: Your high-level mission control featuring audience growth trends, recent campaign metrics, and the launch checklist.
Campaigns: Where you create, draft, schedule, pause, and review broadcast campaigns.
Templates: Reusable email designs, including pre-built system templates styled automatically to match your website brand colors.
Who You Send It To:
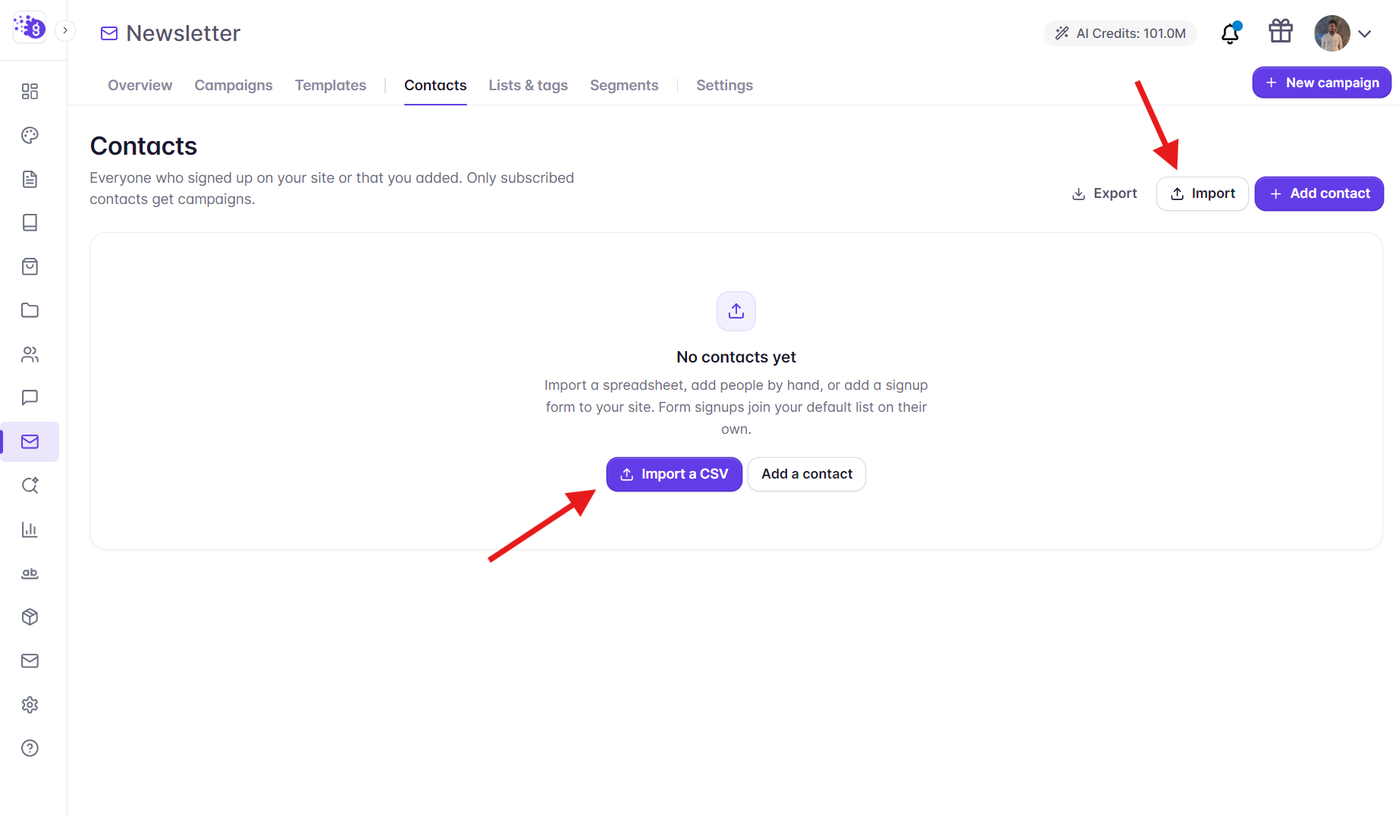
Contacts: Your complete subscriber directory, showing individual statuses (Subscribed, Pending confirmation, Unsubscribed, Cleaned, or Complained).
Lists & Tags: Static audience groups with customizable single/double opt-in flows, plus tags for lightweight labeling.
Segments: Dynamic audiences that automatically update based on rules, subscriber behavior, and activity.
How It Is Sent:
Settings: Default sender names, reply-to addresses, verified postal addresses for anti-spam compliance, custom email connections (SMTP, Amazon SES, SendGrid, etc.), and suppression lists.
Step 1: Follow the 4-Step Launch Checklist
When you first open the Overview tab, Grigora provides an interactive 4-step launch checklist built from your real account state to get your email infrastructure ready for sending:
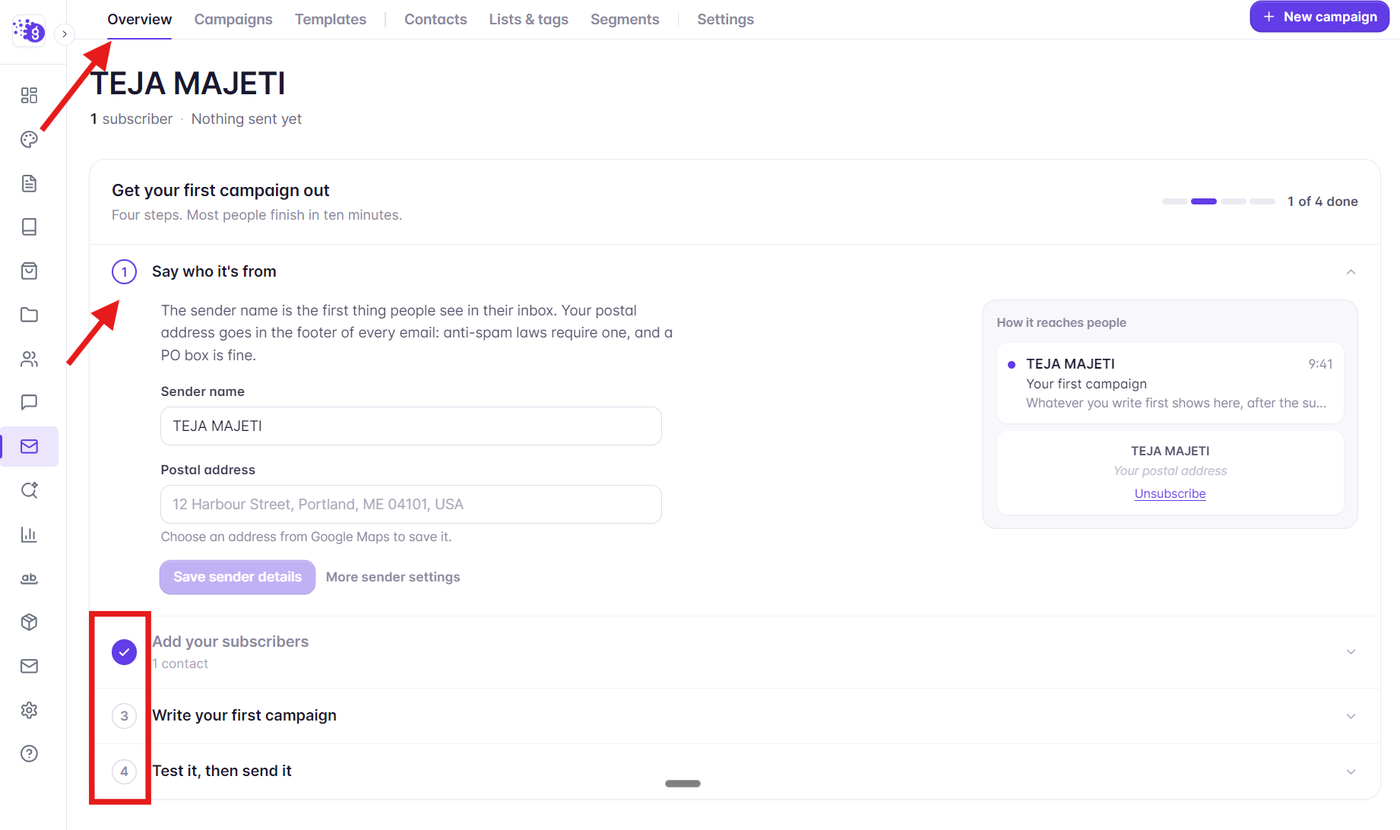
Set Sender Details: Define your sender name, email prefix, reply-to address, and physical mailing address.
Add Your First Subscribers: Import existing subscribers via CSV or add test contacts manually.
Design Your First Email: Start a draft campaign or choose a pre-styled brand template in the visual editor.
Send or Schedule: Perform a test send to your inbox, then launch your first live campaign.
Step 2: Configure Your Sender Profile & Anti-Spam Compliance
Before launching an email campaign, configure your default sender settings under Newsletter > Settings:
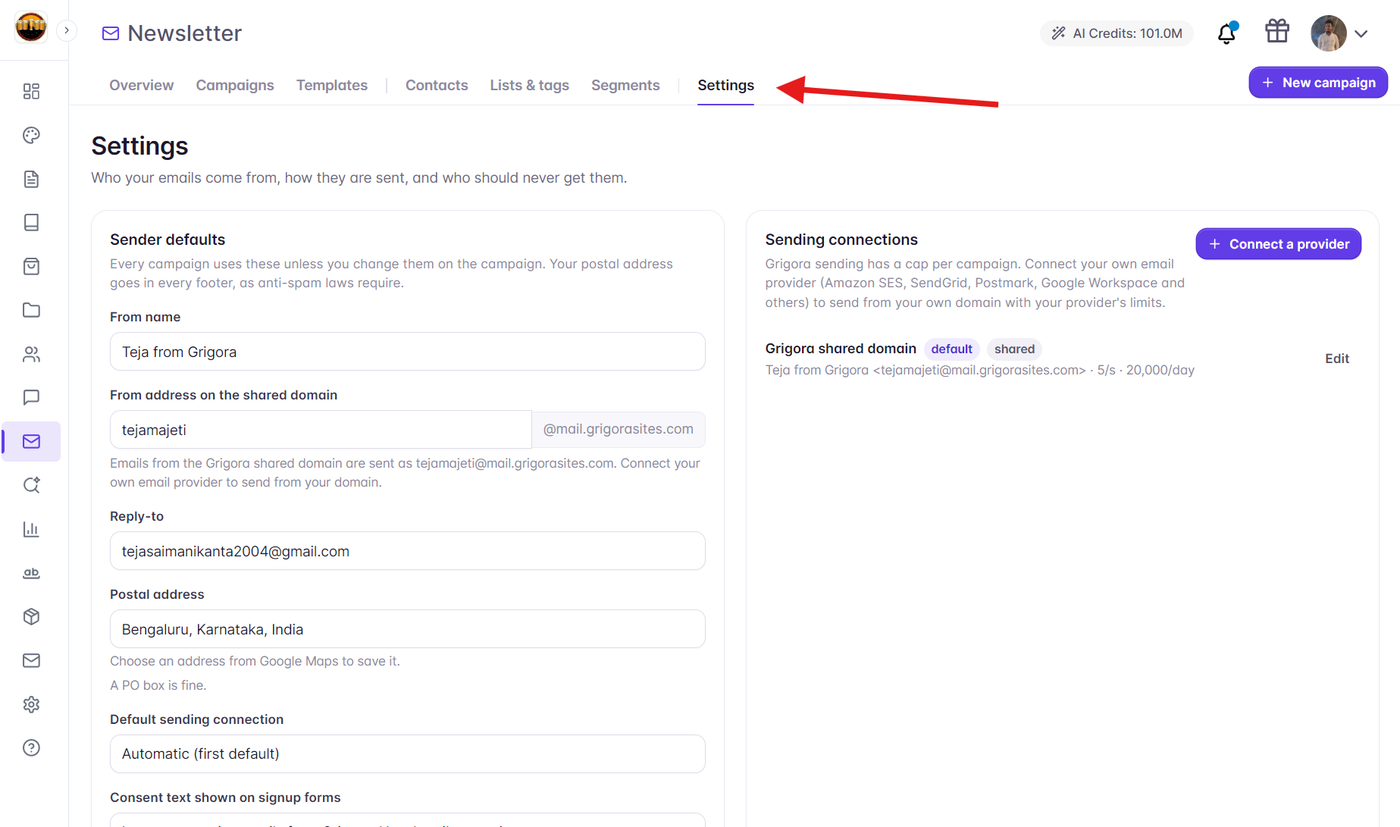
From Name: The display name subscribers see in their inboxes (e.g., Acme Weekly or Sarah from Acme).
From Address (Shared Domain): By default, Grigora lets you send immediately without DNS setup using a verified shared domain address (e.g.,
hello@mail.grigorasites.com).Reply-To Address: An active email address where customer questions and email replies will arrive.
Postal Address (Legal Requirement): Anti-spam regulations (including CAN-SPAM and GDPR) legally require a physical postal address or PO Box in every marketing email footer. Grigora features a built-in Google Maps address lookup that automatically formats and attaches your verified location.
Email Providers (Optional): While Grigora provides built-in delivery for up to 1,000 subscribers per send, you can easily connect your own custom domain provider (such as Amazon SES, SendGrid, Mailgun, Postmark, Brevo, or Custom SMTP) with no caps.
Step 3: Import and Organize Your Contacts
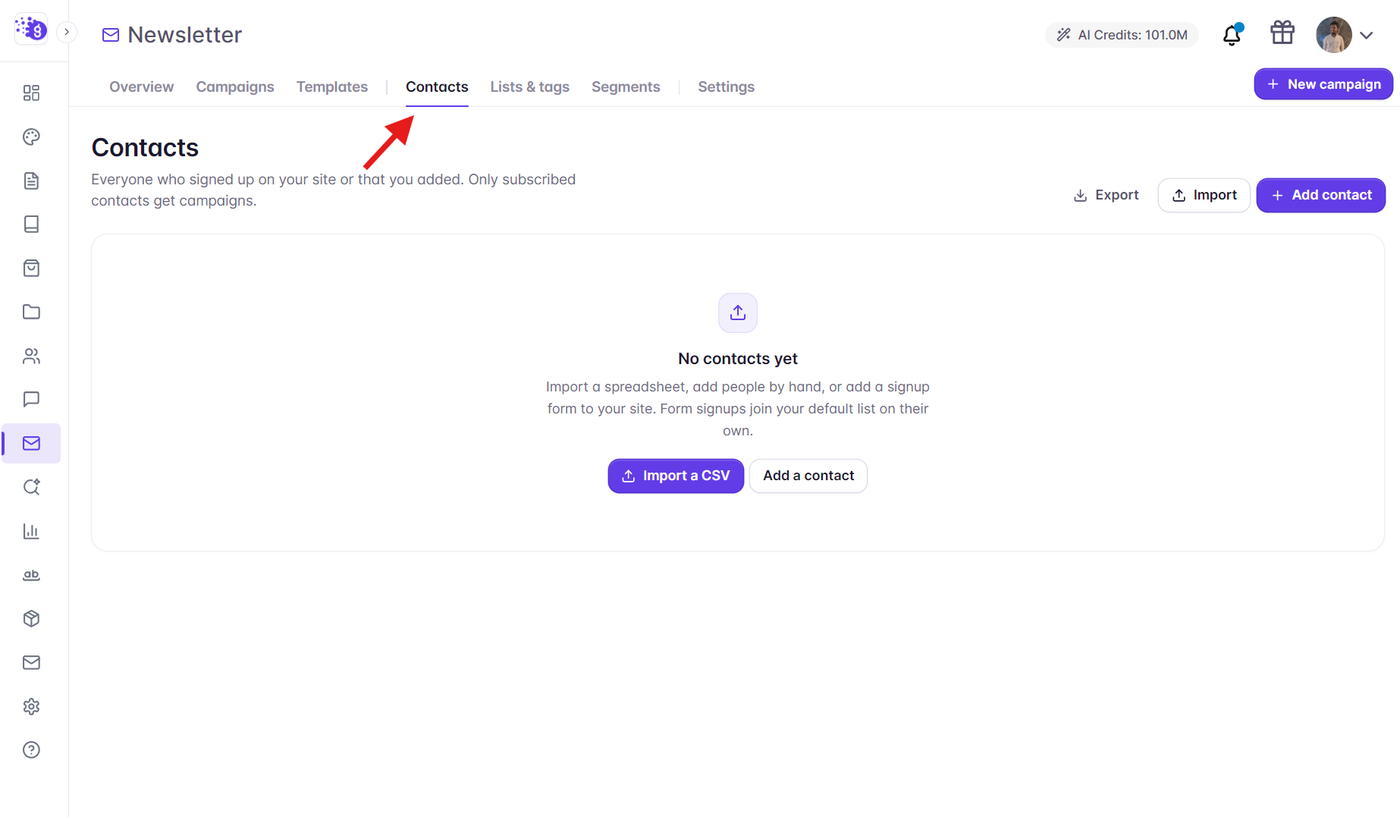
Navigate to Newsletter > Contacts to view and manage your subscribers.
Importing Existing Subscribers
If you are migrating from another platform (like Mailchimp, Substack, or ConvertKit), click Import to open the CSV Import Wizard:
Upload your CSV or Excel file containing your contact list.
Map the CSV headers to Grigora contact fields (Email, First Name, Last Name, Phone, and Custom Fields).
Assign the imported subscribers to specific lists or apply tags.
Review the preview and confirm the import.
Understanding Contact Statuses
Subscribed: Active contacts who receive marketing campaigns.
Pending: Contacts awaiting double opt-in email verification.
Unsubscribed: Contacts who clicked the unsubscribe link or were removed manually.
Cleaned: Addresses automatically removed due to hard bounces or invalid formats.
Complained: Contacts who marked an email as spam (automatically suppressed from future sends).
Step 4: Create an Email Campaign (The 4-Step Builder)
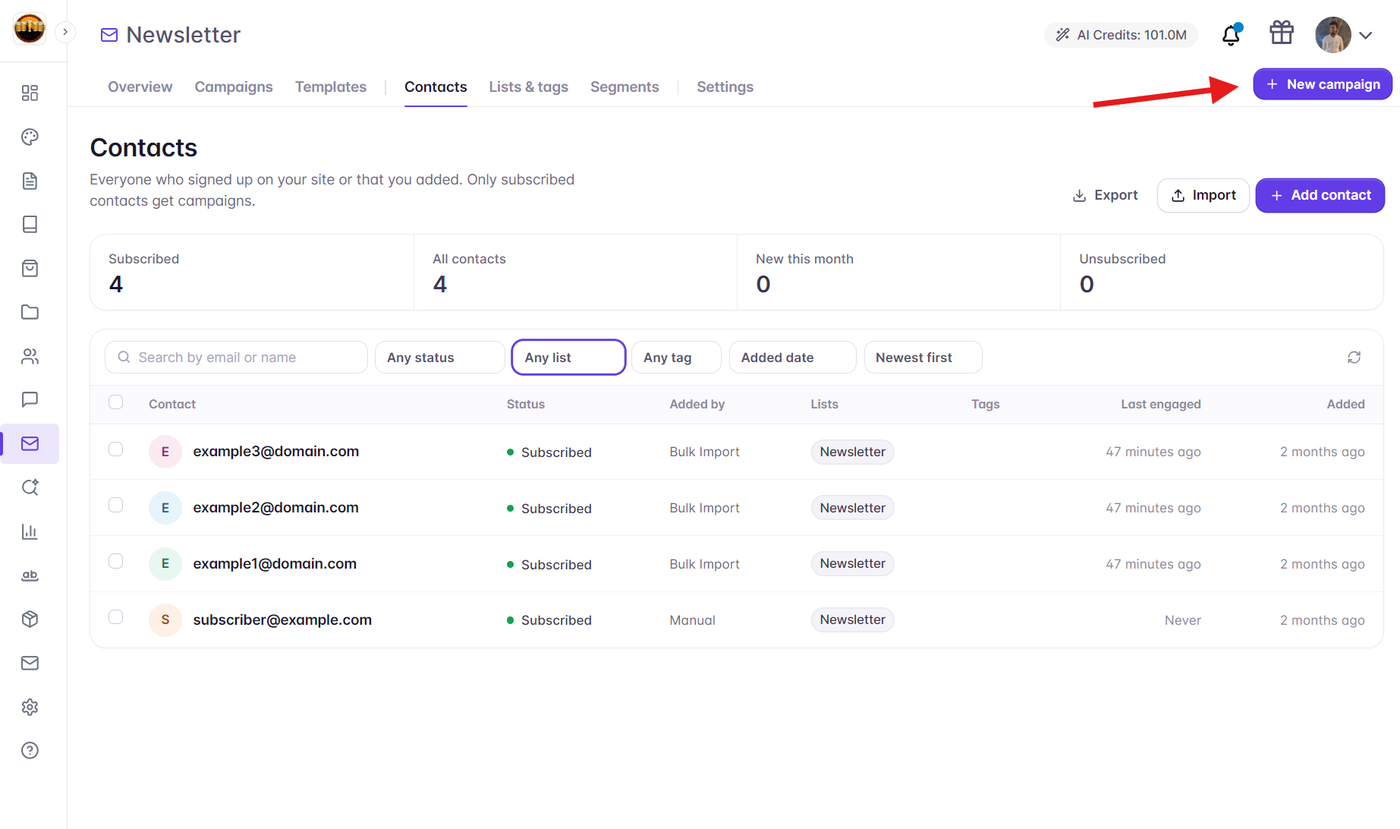
When you are ready to send an email, click the purple New campaign button in the top navigation. Grigora guides you through a streamlined 4-step creation process:
1. Setup (Subject & Sender)
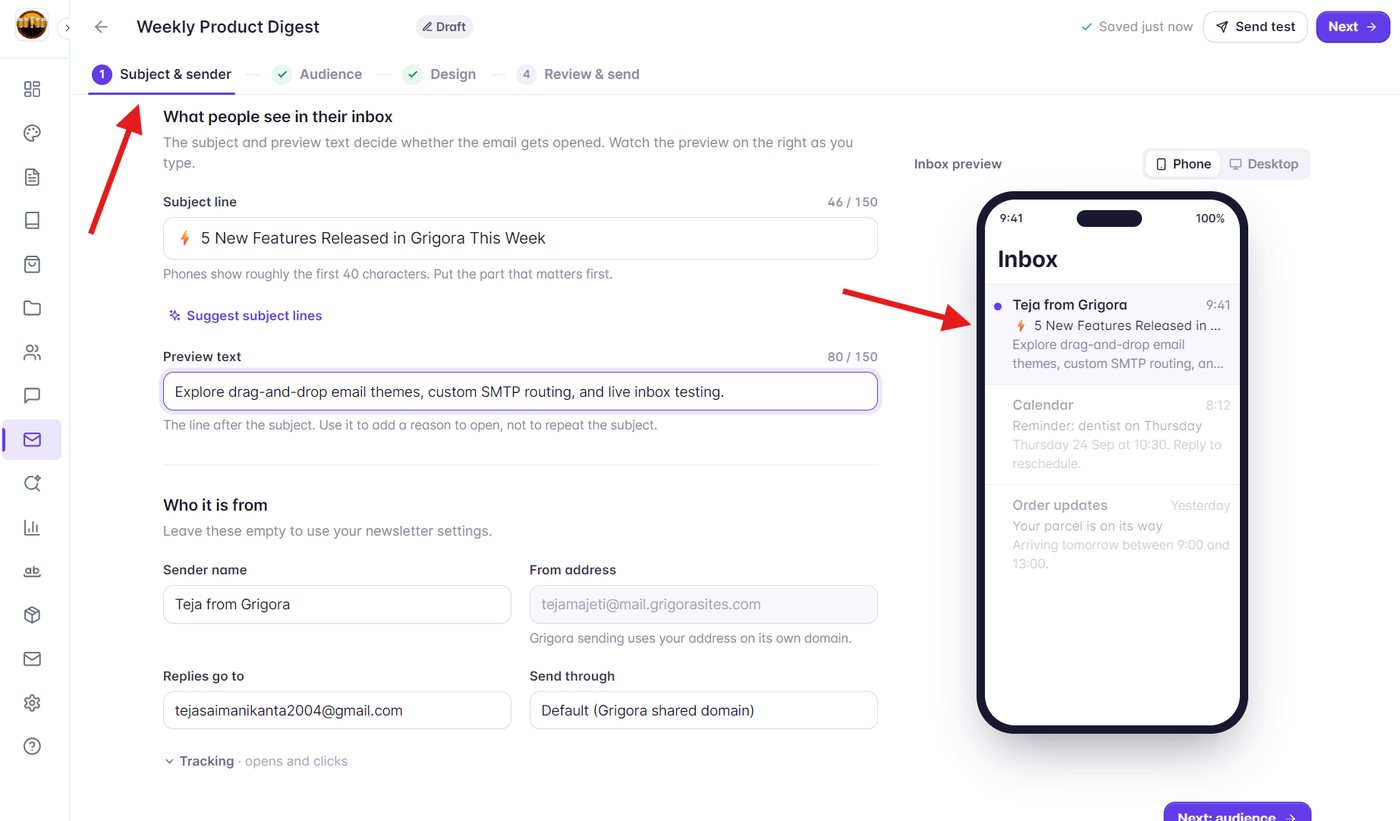
Enter your campaign title, email subject line, and preview text (preheader). Grigora displays an interactive Live Inbox Preview that simulates how your subject and preview text will appear across mobile and desktop devices, highlighting if your subject line is truncated.
2. Audience Targeting
Choose exactly who should receive your campaign. You can include or exclude specific Lists, Tags, or Dynamic Segments. Grigora calculates your real-time total recipient count, automatically excluding any unsubscribed, bounced, or suppressed contacts.
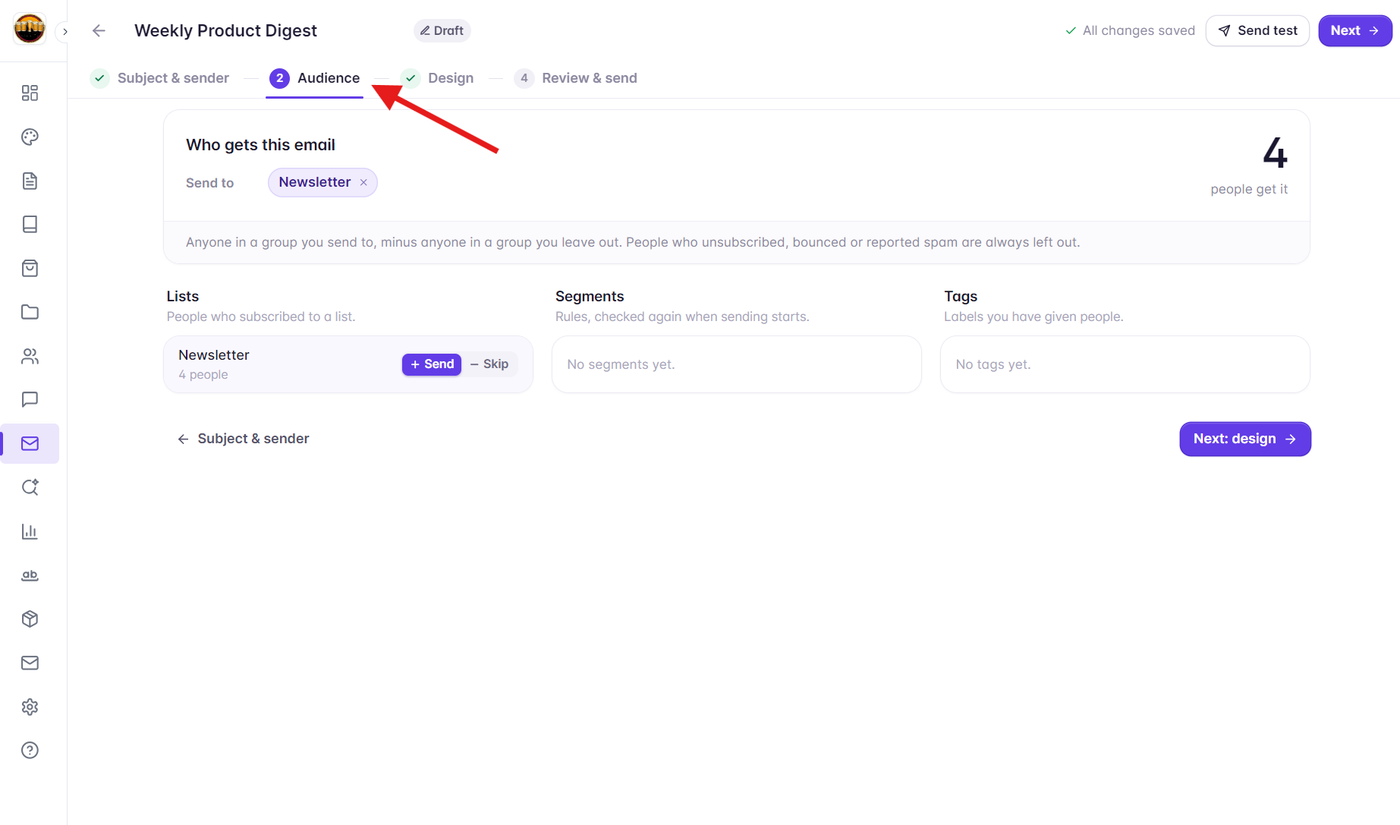
3. Content (Visual Drag-and-Drop Composer)
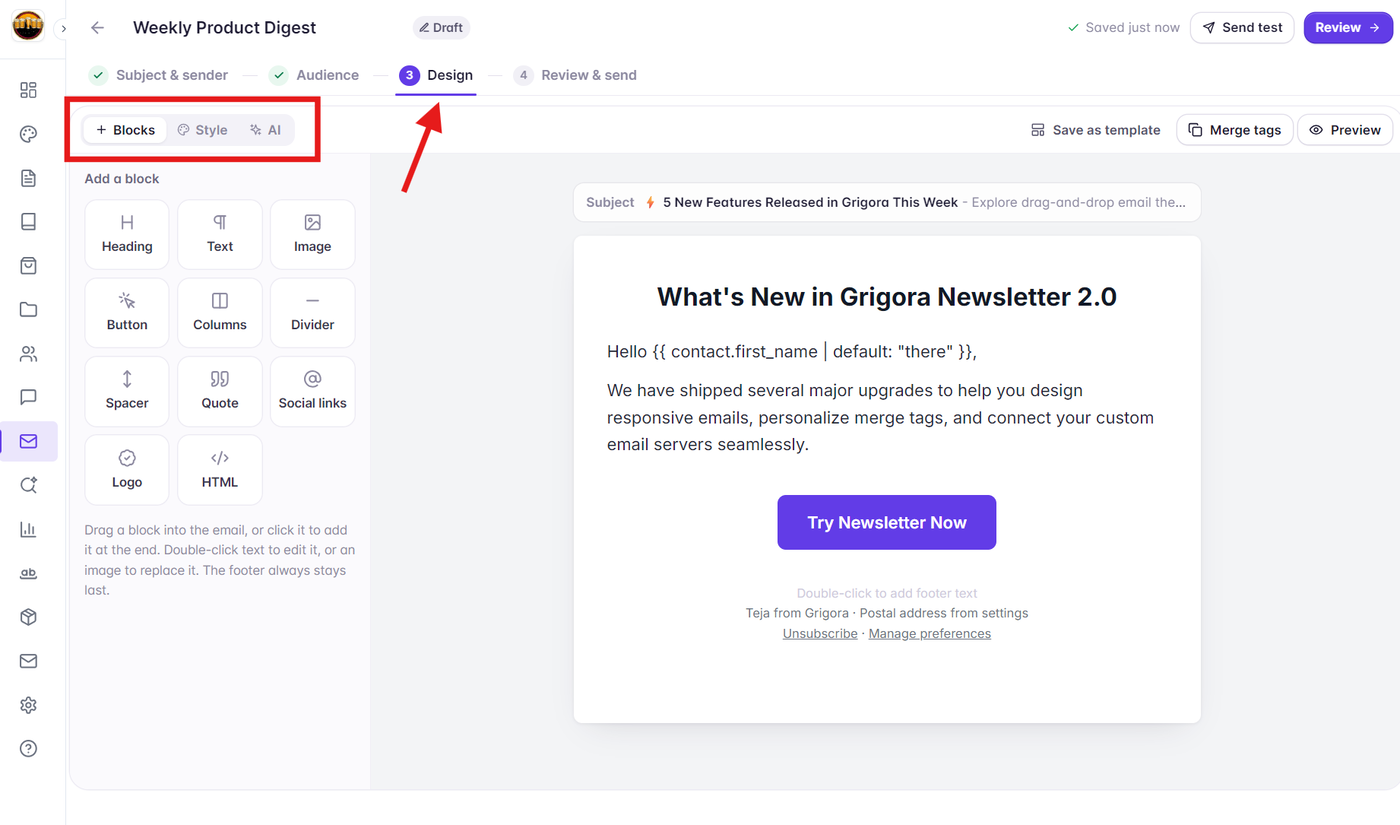
Design your email using Grigora's visual drag-and-drop email builder:
14 Drag-and-Drop Blocks: Add logos, headings, text blocks, images, CTA buttons, multi-column layouts, quotes, social links, blog post previews, product cards, dividers, spacers, and custom HTML.
Rich Text & Personalization: Format text directly with inline bubble controls and insert merge tags (such as
{{first_name}}) for personalized messaging.AI Designer: Use AI prompts directly in the composer to generate copy or restyle layouts.
Link Problem Checker: Automated validation that alerts you to broken links or missing destinations before sending.
Device Previews & Test Sends: Switch between Desktop, Mobile, and Plain Text views, or trigger a test dispatch directly to your inbox.
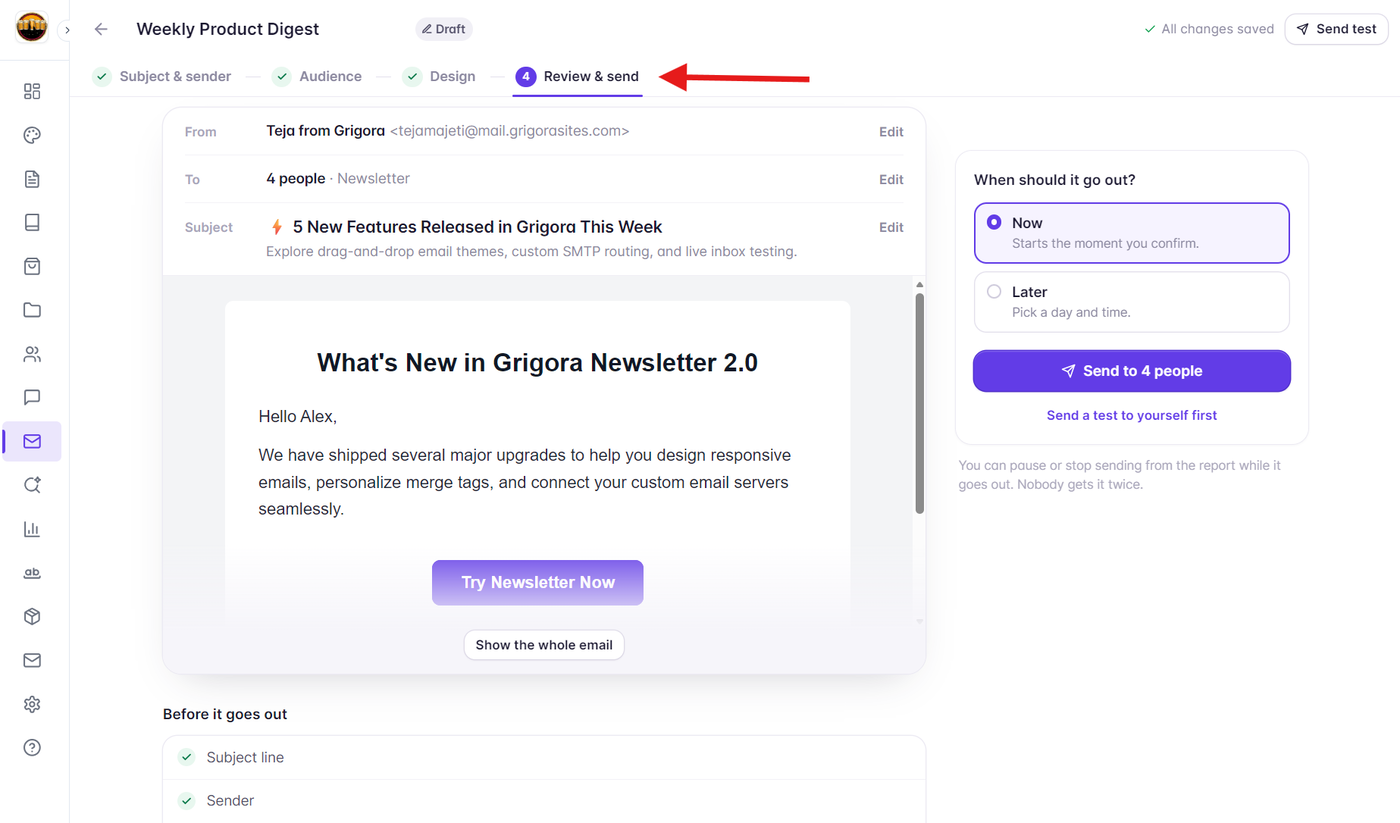
4. Review & Send
The review screen performs a comprehensive pre-flight checklist. It verifies your sender connection, legal address, subject line, audience count, and email content. From here, you can:
Send Now: Begin immediate dispatch across your delivery queue.
Schedule for Later: Pick a specific date, time, and timezone. You can also send using Recipient Local Time so subscribers receive your email at the optimal hour in their respective timezones.
Step 5: Measure Results with Campaign Reports
Once your campaign is dispatched, open its dedicated report under Campaigns to track reader engagement in real time:
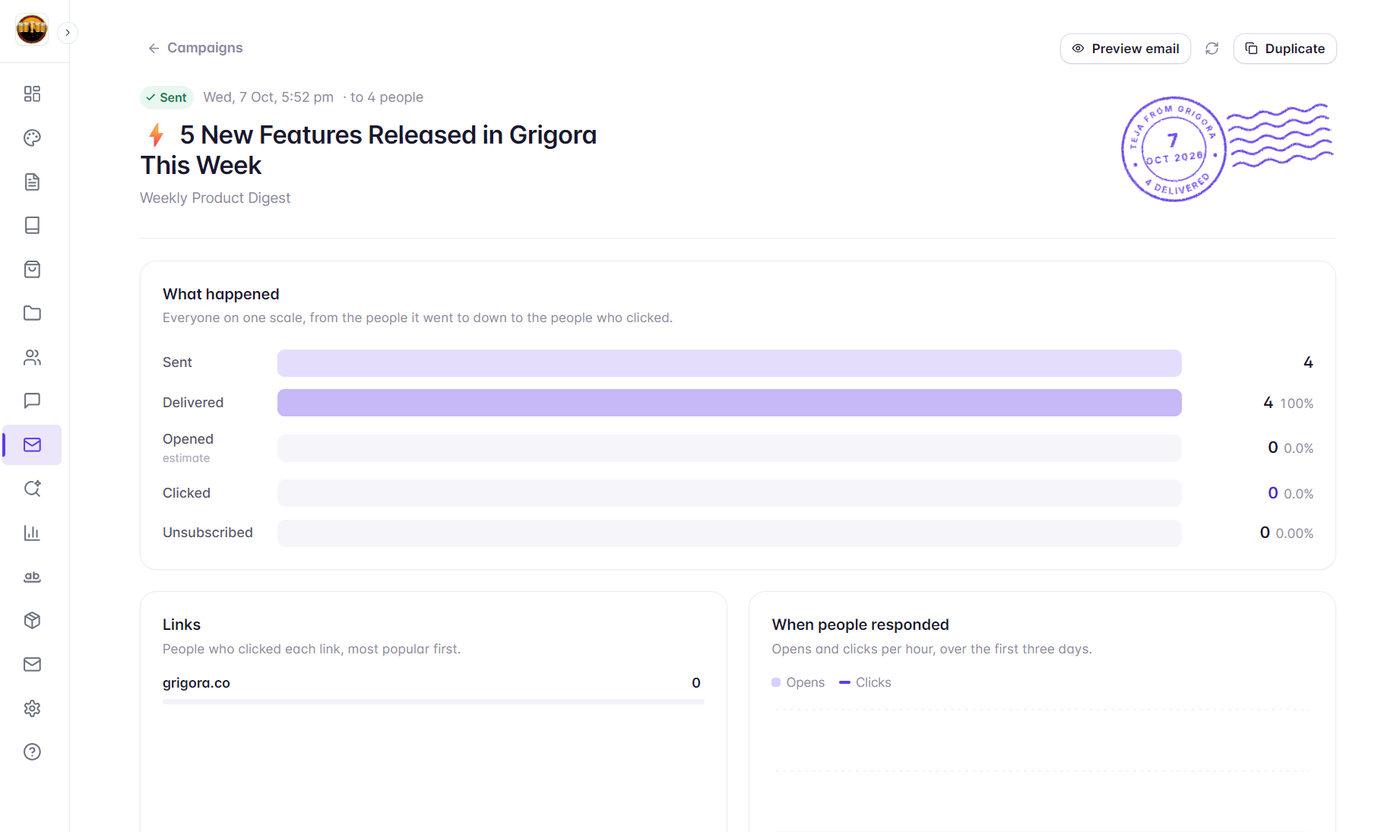
Delivery Funnel: Visualize your email progression from Sent → Delivered → Opened → Clicked.
Link Click Breakdown: Identify exactly which links in your email generated the most clicks.
Recipient Activity Log: Review individual recipient statuses (Delivered, Queued, Skipped, Bounced, or Failed) with one-click options to retry failed dispatches.
Summary & Next Steps
You are now ready to launch your first email campaign in Grigora! To dive deeper into specific advanced features, explore our companion guides:
How to Connect Custom SMTP and Email Providers in Grigora
How to Build Dynamic Segments with Multi-Condition Rules
How to Master the Drag-and-Drop Visual Email Composer
How to Use Popup and Inline Content Lockers to Grow Subscribers