

Creating and dispatching an email campaign in Grigora is intuitive, structured, and fast. The Campaign Builder guides you from an initial concept into a finished broadcast. When starting a campaign, Grigora provides three distinct starting options—letting you write from scratch, generate with AI, or start from a ready-made template—before guiding you through the four core builder steps: Setup, Audience, Design, and Review & send.
This comprehensive guide walks you through every stage of building a campaign from start to finish, explaining all creation options and configuration steps in detail.
How to Start a New Campaign: The Creation Modal & 3 Pathways
To begin creating an email campaign, navigate to your Grigora dashboard and select Newsletter from the sidebar. Under the Campaigns tab, click the purple + New campaign button located in the top-right corner (this button is also accessible from the top navigation bar across all newsletter screens).
Clicking + New campaign opens the New campaign modal dialog. The modal presents a guiding description: "You can change everything later: audience, design, subject and send time."
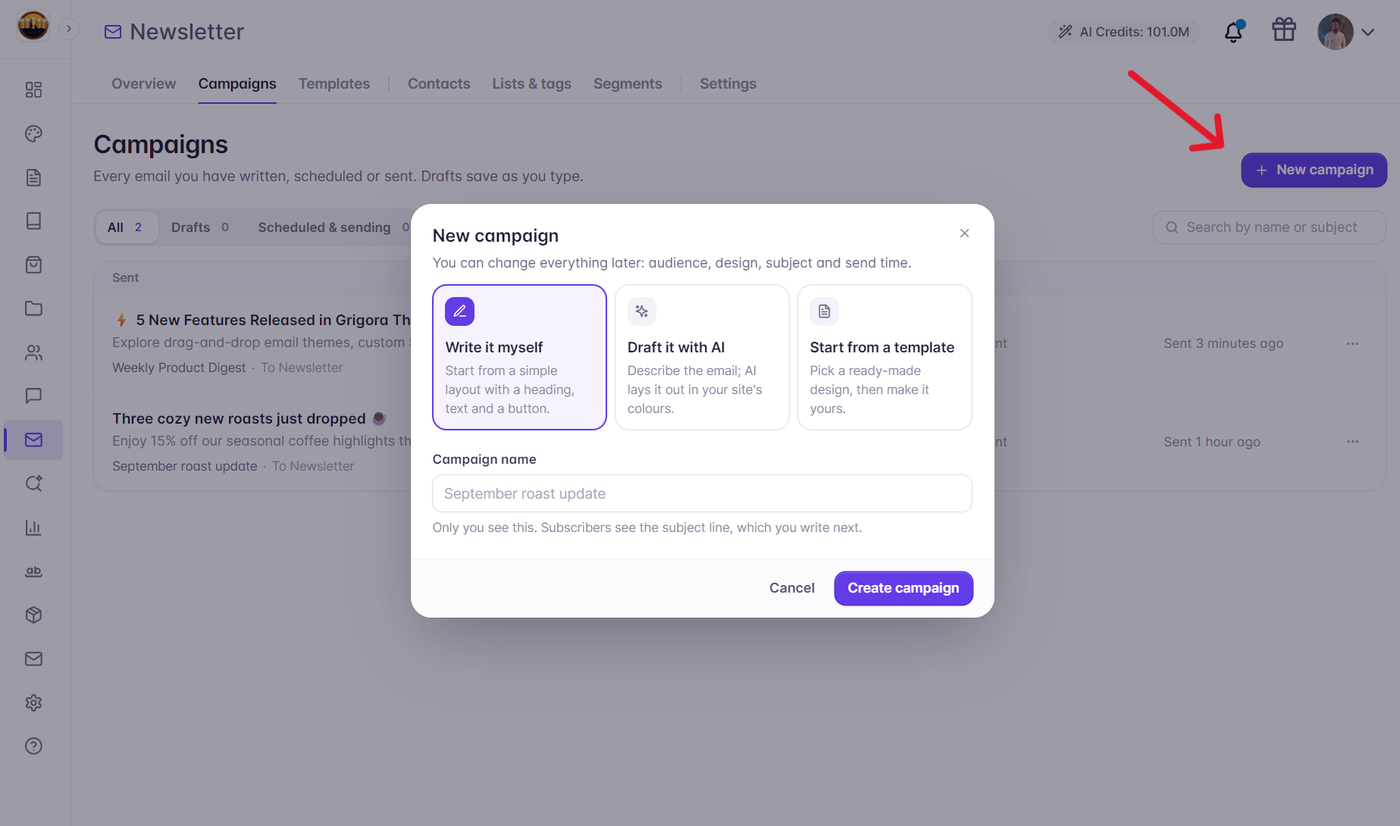
At the top of the modal, you will find the "How do you want to start?" selector, offering three distinct options:
Option 1: Write it myself (Blank Canvas)
Description: "Start from a simple layout with a heading, text and a button."
How it works: This is the default option. Clicking this option starts your campaign with a clean, simple layout containing a heading, a text paragraph, and a call-to-action button. It gives you an open canvas where you can write your own message and drag in any additional blocks as you build.
Option 2: Draft it with AI (AI Email Designer)
Description: "Describe the email; AI lays it out in your site's colours."
How it works: Clicking this option opens the visual editor with the AI Email Designer panel ready on your screen. You type a prompt describing what your email should say (for example: "A monthly product recap announcing our new dark mode feature and offering 20% off all annual plans"), choose a tone (such as Friendly, Professional, or Bold), and click Generate. Grigora automatically writes the text, adds the relevant layout blocks, and styles the entire email in your website's brand colors.
Option 3: Start from a template (Template Gallery)
Description: "Pick a ready-made design, then make it yours."
How it works: Clicking this option updates the action button to "Choose a template". Clicking it brings you to the Templates page. You can browse ready-made designs across categories (such as Announcements, Store Spotlights, Newsletters, and Event Invitations), preview how they look on mobile and desktop screens, and click "Use template" to start your campaign with that complete pre-built design ready for you to customize.
Entering the Campaign Name & Preset Segments
Campaign name (required): When selecting Write it myself or Draft it with AI, enter an internal name for your campaign (such as October Product Launch). This name is only for your reference in your dashboard—subscribers will never see it. You will write your public subject line in the next step.
Preset Segment Targeting: If you started the campaign by clicking "Send to segment" from the Segments page, the modal shows a note indicating which segment is selected and automatically assigns that audience to your campaign.
Once you enter a name and click Create campaign, Grigora creates the draft and opens the 4-Step Campaign Builder.
Step 1: Setup (Subject Line, Preheader & Sender Defaults)
The Setup screen determines how your broadcast appears inside subscribers' inboxes before they open it:
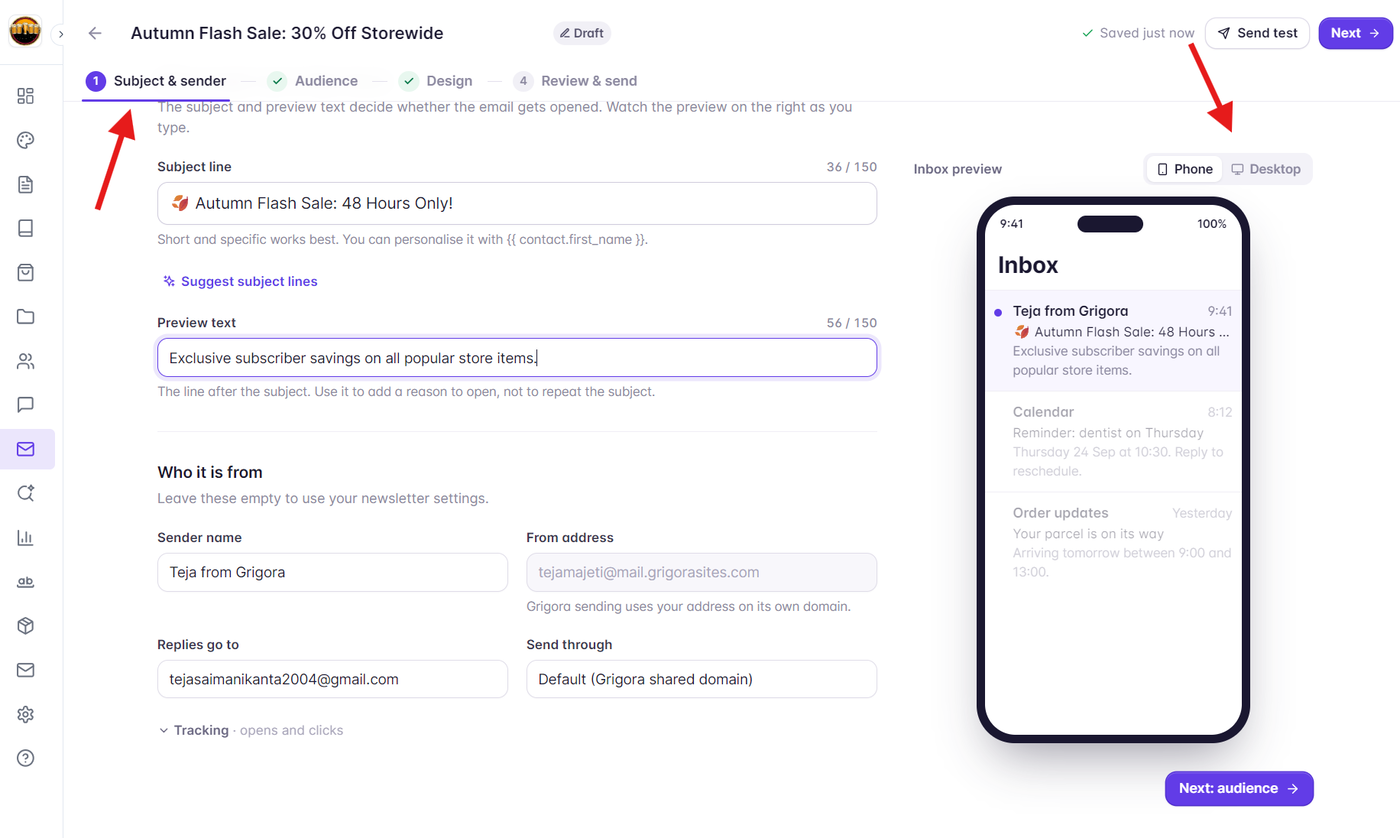
Subject Line: Write a concise, high-converting headline. The character counter indicates optimal length (phones typically show only the first 40 characters; keeping it under 60 characters prevents truncation). You can personalize the subject with dynamic subscriber merge tags like
{{ contact.first_name }}.Preview Text (Preheader): The teaser snippet displayed alongside or directly below the subject line in Gmail, Apple Mail, and Outlook. Use this space to complement the subject line and provide additional context.
Sender Name & From Address: Pre-filled from your project's default settings. You can override the From Name for this specific campaign or route outgoing messages through a custom connected email server.
Reply-To Address: Specify where replies should be routed when subscribers hit "Reply" in their email client.
Live Inbox Preview Simulator: On the right side of the screen, an interactive preview updates in real time as you type. Toggle between Phone and Desktop tabs to verify exactly how your subject line and preview text render across different screen widths.
Tracking Options: Expand the Tracking section to toggle Count clicks (link redirect tracking) and Count opens (invisible tracking pixel).
When you are satisfied with your setup, click Next: Audience in the bottom navigation bar.
Step 2: Audience (Targeting, Segments & Exclusions)
The Audience screen lets you precisely define which contacts will receive your email:
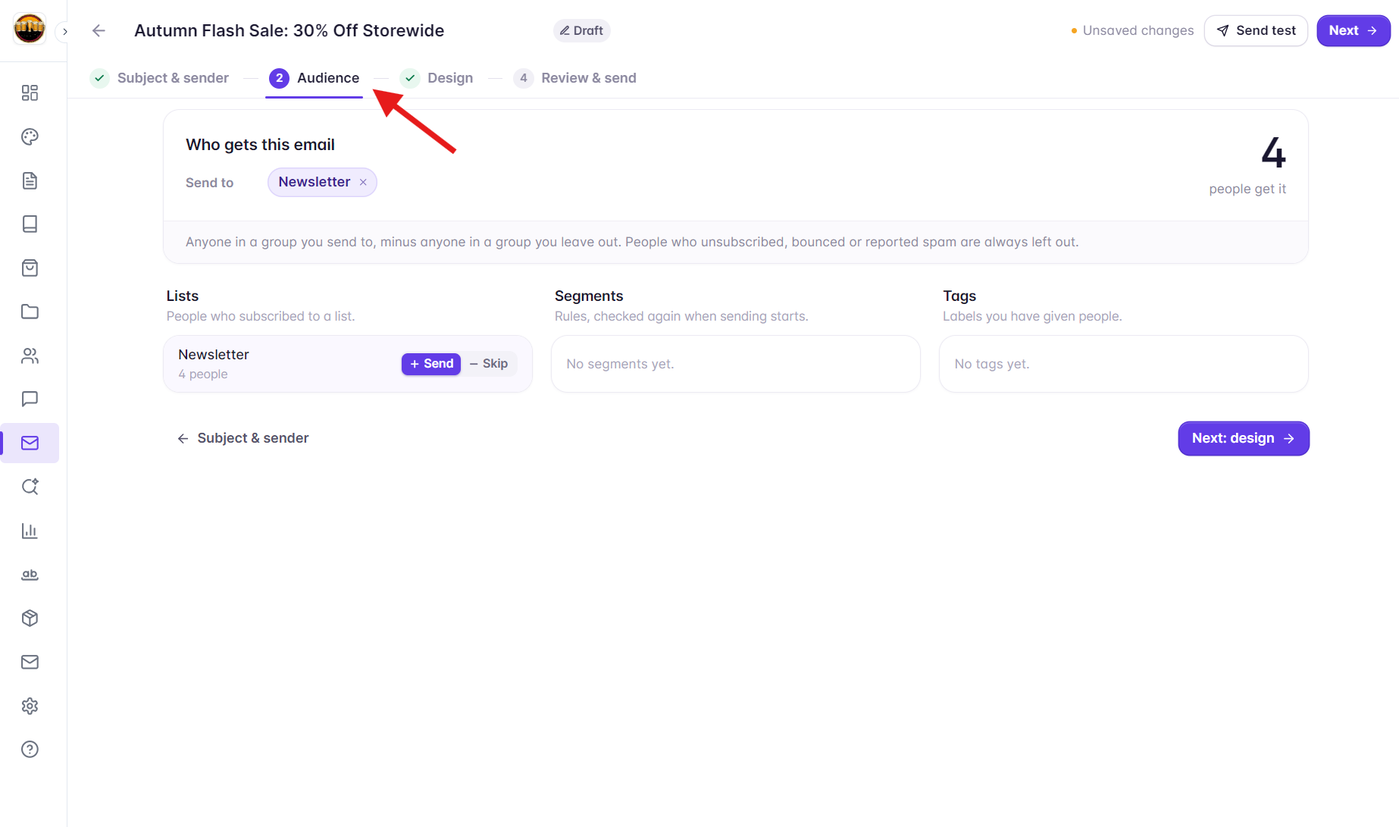
Send to (Include Groups): Select one or more Lists, Tags, or dynamic Segments. Anyone belonging to at least one of these groups will be included in the dispatch.
Except (Exclude Groups): Suppress specific groups from receiving the email (e.g., target "Weekly Product Digest" list, but exclude the tag "Inactive / At-Risk" or customers tagged "Purchased Today").
Audience Calculation: Grigora calculates the live recipient count on the right. It automatically filters out unsubscribed contacts, hard-bounced addresses, and unconfirmed double opt-in signups.
Shared Domain Cap Check: If sending through Grigora's shared domain, campaigns are capped at 1,000 recipients. If your selected audience exceeds this limit, Grigora displays an alert prompting you to narrow the audience or connect custom SMTP.
Click Next: Design to proceed.
Step 3: Design (Blocks, Global Style & AI Designer)
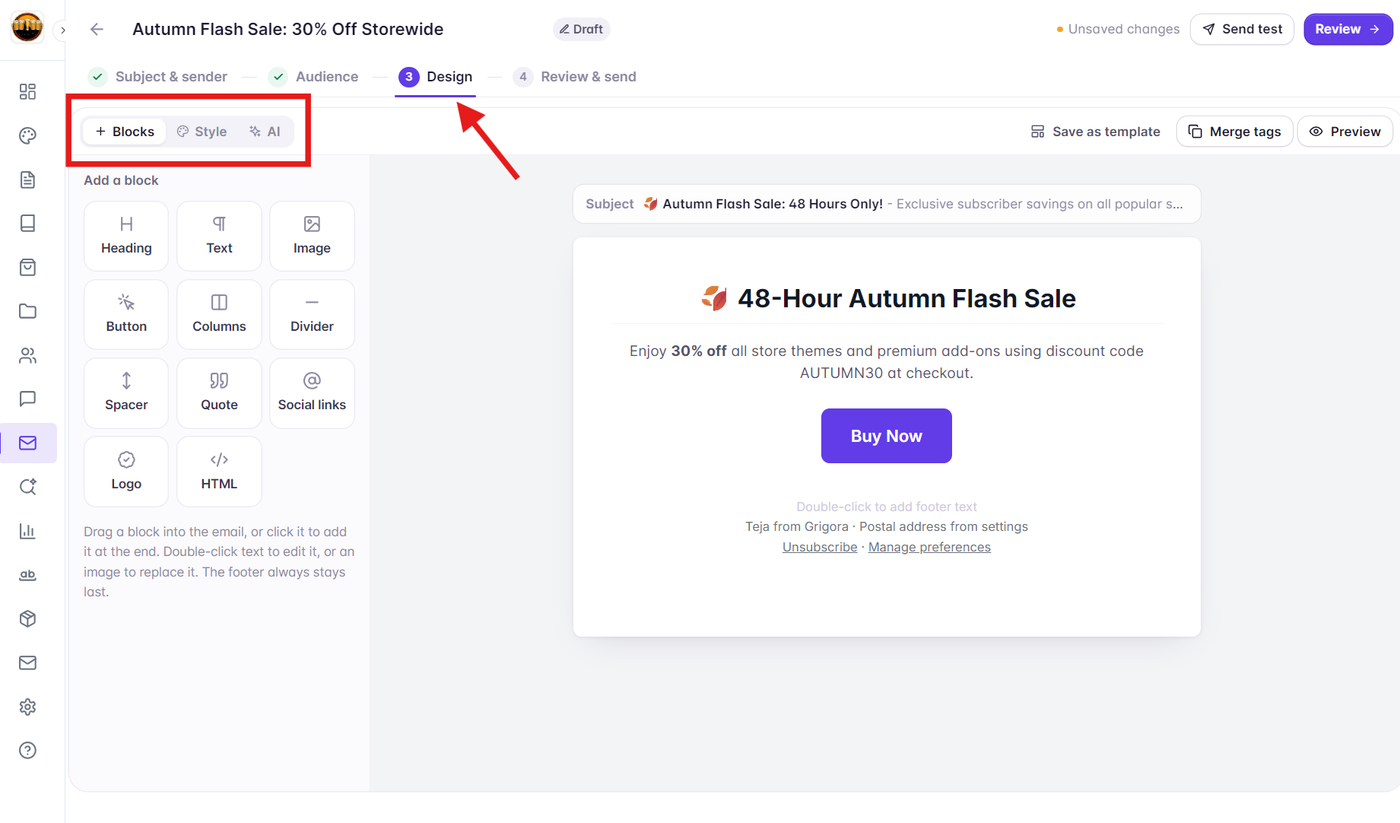
The Design step opens Grigora's visual email editor. At the top-left of the sidebar, you will find three main tabs that control every aspect of your email layout: + Blocks, Style, and AI.
1. The "+ Blocks" Tab (Content Structure)
Clicking the + Blocks tab reveals the complete palette of building blocks you can place into your email:
Available Blocks: Drag and drop any block onto the canvas or click it to place it at the end of your email:
Heading: Section titles and prominent headlines (H1, H2, H3).
Text: Body copy with in-place rich text editing (bold, italic, lists, and links).
Image: Uploaded images, banners, or logos with customizable width, alignment, and border radius.
Button: Prominent call-to-action buttons with customizable links, colors, padding, and corner rounding.
Columns: Multi-column side-by-side layouts with adjustable column widths that stack cleanly on mobile.
Divider & Spacer: Visual horizontal lines and vertical spacing to give content breathing room.
Quote: Testimonial block with styled quotation marks and author attribution.
Social links: Icons for your social networks (X, Instagram, LinkedIn, YouTube, Facebook).
Blog post: Dynamic blog post card linking directly to published articles on your website.
Product: E-commerce item card with product image, price tag, description, and direct buy button.
Custom HTML: Raw embed block for specialized markup.
Footer: Standardized email footer containing your physical address, unsubscribe link, and preferences link.
Editing Blocks: When you click on any block directly on the canvas, the sidebar automatically switches to show that specific block's configuration settings (such as padding, colors, font size, and URLs).
2. The "Style" Tab (Global Theme & Branding)
Clicking the Style tab in the sidebar opens the global appearance controls, allowing you to establish a consistent visual identity across the entire email without editing blocks one by one:
Font: Choose the global typography family for all headings and body text (such as Inter, Helvetica, Arial, Georgia, or custom fonts).
Text size: Adjust the baseline font size for body copy.
Width: Set the maximum width of the email container (between 480px and 800px; 600px is the standard recommended email width).
Corners: Set the global border radius applied to image containers, buttons, and card borders.
Padding: Adjust the inner spacing between your email content and the canvas edges.
Colours: Use interactive color pickers to customize:
Page background: The outer background color behind the email canvas.
Email background: The inner background color of the email body container.
Text: The default color for body paragraphs.
Headings: The color applied across all titles and headings.
Links: The accent color for hyperlinks.
Buttons & Button text: The default background and text colors for all call-to-action buttons.
3. The "AI" Tab (Drafting with AI & Subject Line Suggestions)
Clicking the AI tab opens Grigora's integrated AI assistant directly inside the composer sidebar:
Draft the email with AI:
Prompt Box: Type a natural description of what this email should achieve (e.g., "Announce our spring clearance sale to previous customers with 3 product highlights and 20% discount code SPRING20").
Tone Selector: Choose from tones such as Friendly, Professional, Bold, Casual, or Enthusiastic.
Draft Button: Click Draft the email to have Grigora automatically generate tailored copy, select fitting block arrangements, and apply your site's brand theme.
Suggest subject lines: Click Suggest subject lines to have AI analyze your completed email design and generate compelling, high-converting subject line suggestions. Clicking any suggested option applies it directly to your campaign.
Top Toolbar Actions
At the top-right of the editor screen, convenient utility tools help you finalize your email:
Save as template: Save your current email layout to your project's Template Gallery so you or your team can reuse it for future campaigns.
Merge tags: Opens a quick reference drawer displaying all available subscriber personalization tags (such as
{{ contact.first_name }},{{ contact.email }}, and custom fields) with one-click copy buttons.Preview: Opens a full-screen preview simulator to test how the email displays on both Desktop and Mobile devices.
Send test: Enter your personal email address to dispatch an immediate test message and verify inbox appearance before launching.
Once your design is complete, click Review & send (or Next: Review & send) in the top-right corner.
Step 4: Review & Send (Pre-Flight Checks, Send & Schedule)
The final step displays an envelope summary of your campaign and runs an automated pre-flight readiness audit:
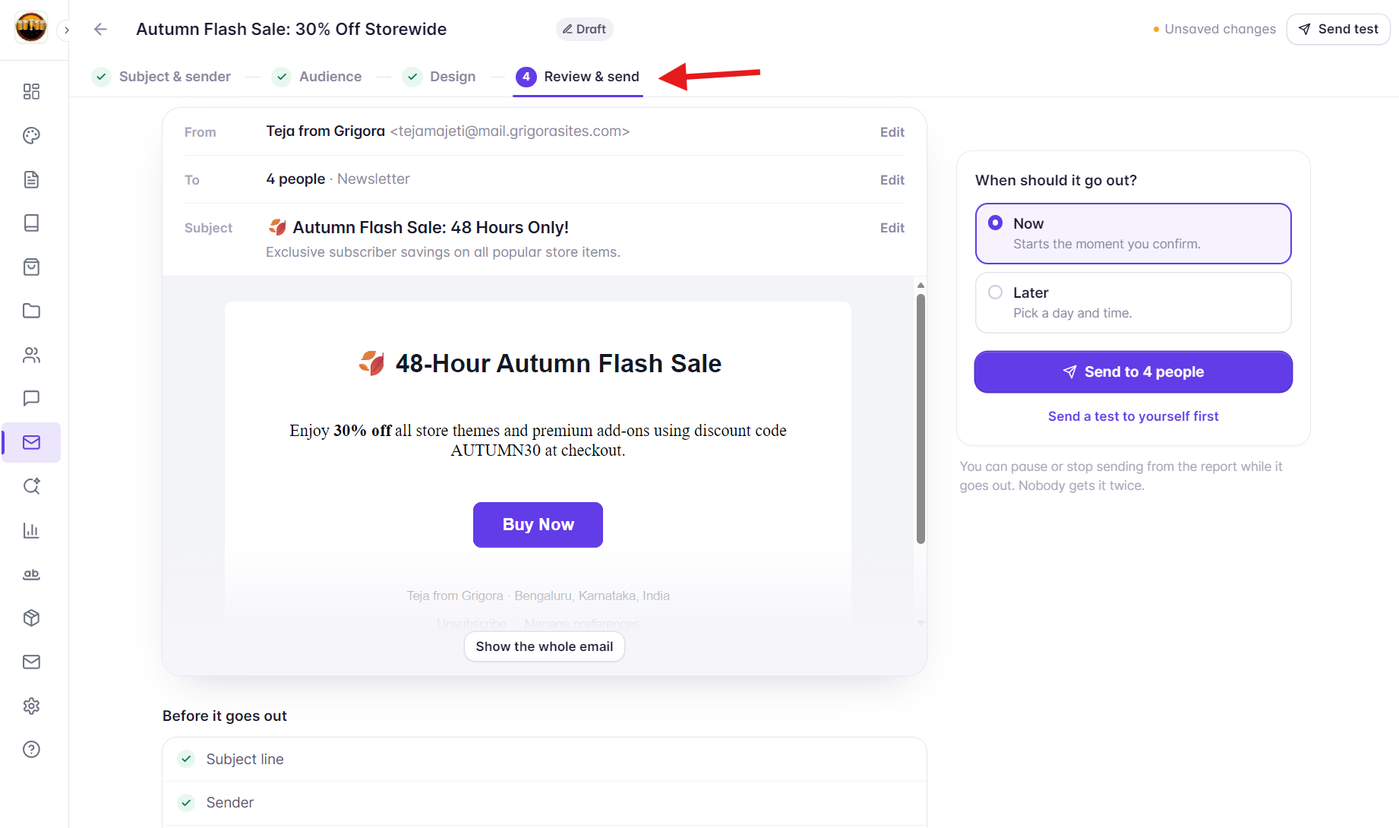
Envelope Summary: Review your verified From Name, From Address, Reply-To, Subject Line, Preheader, and final rendered HTML email.
Readiness Checklist: Grigora validates that all requirements are met:
Subject line is present.
Sender details and compliant physical postal address are configured.
Audience recipient count is greater than zero.
Active sending connection is established.
Sending Options:
Send Now: Dispatches your campaign immediately to all qualifying recipients.
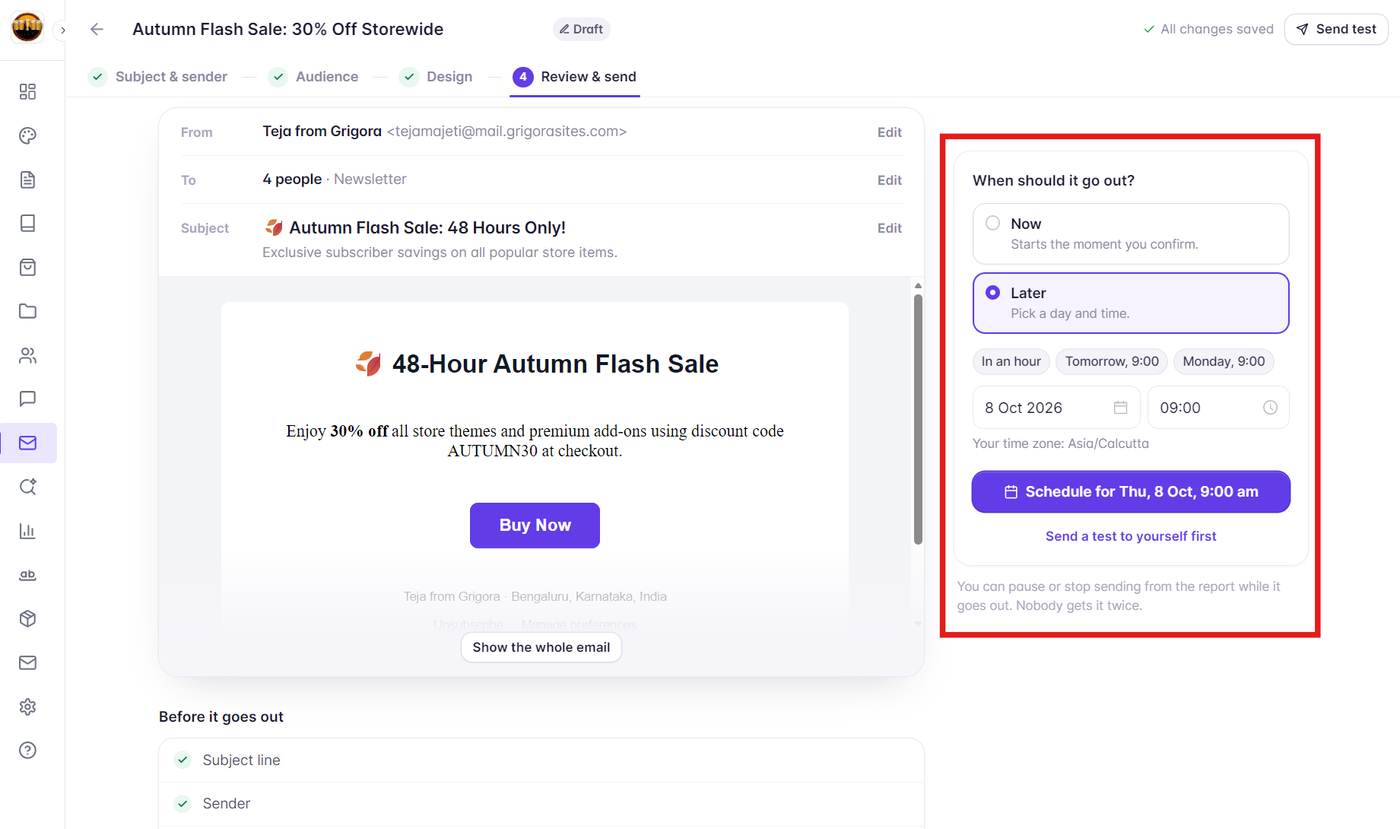
Schedule for Later: Opens the scheduling modal allowing you to pick a future dispatch date, time, and timezone. You can also select Recipient Local Time to ensure the campaign delivers at the selected hour in each subscriber's local timezone.
Next Steps
Continue mastering email marketing in Grigora with these related guides:
How to Use Grigora’s AI Email Designer to Generate and Restyle Newsletter Layouts
How to Use and Customize Grigora’s Brand-Themed Email Templates
How to Craft High-Converting Subject Lines and Preview Text with Live Inbox Previews
How to Target the Right Audience: Including and Excluding Lists, Tags, and Segments
Getting Started with the Grigora Drag-and-Drop Email Composer
How to Read and Analyze Campaign Reports in Grigora